Tag: coding

  • Crossing the Mixed Content Boundary: abusing STUN/TURN as a Communication Channel

    TL;DR: You can send and receive data using TURN by encoding data into username and IPv6 UDP address.

    Say that you have a HTTPS website. Modern web safety forbids it from accessing insecure parts of the network using HTTP. This is usually not an issue, since signing a HTTPS certificate for a website is fairly easy thanks to Let’s Encrypt.

    However, there are situations where signing a certificate for a server is not feasible. For example, you cannot obtain a certificate for a server that is not on the public Internet.1 If I have a server running at 192.168.1.100, there are not a lot of options to communicate with it from https://example.com.2

    Examining Existing Options

    With https to http communication not being available, the remaining options are

    • Using redirects, by redirecting users from https://example.com to http://192.168.1.100 and then back to https://example.com, we can encode information in the URL, and pass them back and forth.
      • This is a lot like how SSO is implemented using SAML and OAuth2.
      • This is not great for UX. Having to redirect a user back and forth each time we want to communicate is not good.
    • WebRTC
      • WebRTC cannot by itself establish an connection. It needs a signaling server. This means that the local server would need to connect to the Internet. This may not be feasible or maybe you just don’t want to host a WebRTC signaling server.
    • Use WebRTC, but use redirects to handle signaling
      • This is a lot better than option 1, as you don’t need to do redirects every time when communication is needed.
      • However, this still requires a redirect each time the user visits the website since WebRTC sessions do not persist over navigations. So every time you go to https://example.com, the user needs to be redirected to and from http://192.168.1.100.

    Can we do better than these options? Can we establish a non-TLS connection without redirects, user interaction, or a pre-existing communication channel? Given that we have WebRTC, it means that we just need to pass about a couple KBs of data bidirectionally to establish a connection – is there any way that allows a browser to pass small amount of data crossing the mixed content boundary?

    The answer is yes, via STUN/TURN.

    Smuggling Bytes using STUN/TURN

    Both STUN and TURN are protocols of the Interactive Connectivity Establishment (ICE) suite, intended to establish connectivity though NAT.

    The purpose of STUN is to get a public UDP address of a peer. If we use IPv4, That is 6 bytes of information, 4 bytes from the IP, and 2 bytes from the port (4 bytes usable if we eliminate invalid ports and IP addresses). If we use IPv6, we can get 18 bytes of information (16 bytes usable). The problem with STUN is that there’s no user configurable input to STUN. You can receive data, but not send data.

    The sister protocol TURN is an extension to STUN. TURN allows allocating a UDP relay, in case a connection cannot be established via STUN. Since TURN is a relay server, it is a lot more expensive to run than STUN, therefore some form of authentication is usually required. TURN sends the username in plaintext. Given that the safe MTU is about 512 bytes and there’s overhead in the TURN protocol, it’s possible to send at least 256 bytes of data using a TURN username. We can receive 16 bytes of data from a TURN response, encoded in a IPv6 address and port number pair.

    We are now able to send about 256 bytes of data (encoded in username) and receive 16 bytes of data (encoded in IPv6 address and port) by abusing TURN.

    16 bytes in a response is obviously not sufficient, as a regular WebRTC SDP weighs about 1.5KB. So I developed a janky protocol that splits the request and response into smaller chunks.

    • The client first allocates a request and tells the server how big is request is going to be, encoded in the username. The server returns a 16 byte request ID.
    • The client incrementally sends the parts of the request in 256 byte chunks using the allocated request ID.
    • Once all parts are sent, the client tells the server to execute the request. The server returns the response size.
    • The client incrementally pulls the response from the server in 16 byte chunks.

    Given that a WebRTC SDP is about 1.5KB. This is going to result in about 100 TURN request and response pairs, which translates into 400 UDP packets. We transmitted 3KB using 400 UDP packets, averaging an impressive 7.5 bytes transmitted per UDP packet.

    This is not great. So I trimmed the response SDP down by removing unnecessary information (in particular, redundant candidates). This brought down the SDP size to about 700 bytes.3

    This is still not great, so I added ZLIB compression using a pre-defined dictionary. I compressed the SDPs down to about 300 bytes each – now we only need to send about 80 UDP packets.

    Now we can establish a communication channel by only using IP address + port.

    Putting it All Together

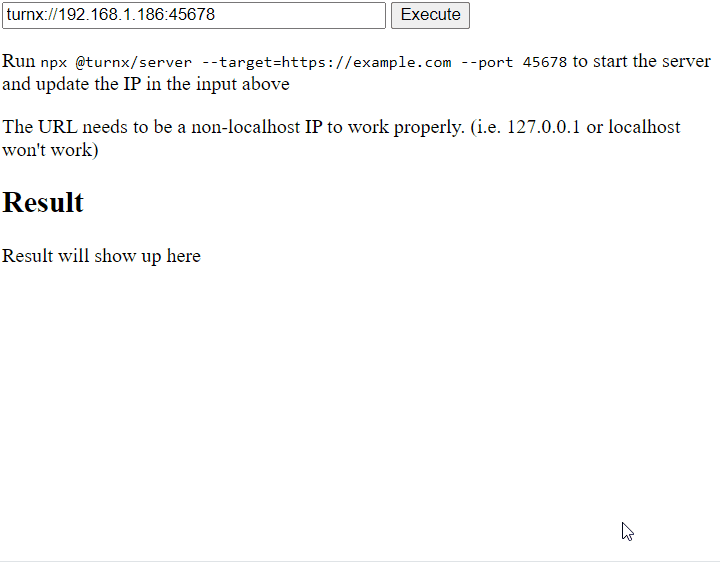
    I made a demo at https://codepen.io/gyf304/pen/oNrjoJj. The demo fetches a proxied version of https://example.com over TURN. It requires 0 user interaction (apart from clicking the “Execute” button) to communicate with a non-secure server from a secure origin.

    I also published NPM packages @turnx/server and @turnx/client, in case people want to give it a spin. The @turnx/server package provides a server that allows you to proxy a HTTP/HTTPS website over TURN, and the @turnx/client package provides a client that implements a similar interface to fetch. The packages are not documented, but the demo above should be sufficient to get you going.

    The source is available at https://github.com/gyf304/turnx.

    It is also worth noting that this communication protocol is extremely inefficient, so the intended usage is to use this to establish an actual connection using WebRTC (e.g. by using WHIP).

    Also: don’t do this over the public Internet.

    1. You can technically sign a cert for a local address using techniques outlined in https://letsencrypt.org/docs/certificates-for-localhost/. But as the article also pointed out, distributing a private cert as part of a software package is a big no-no. ↩︎
    2. Why would someone want to communicate to a LAN server from a secure HTTPS website? I can think of a few use-cases: a media app like Plex where logic is served from a HTTPS remote server, or a PWA, and the content is stored on a local server; a HTTPS website for upgrading the firmware of a LAN only appliance; or a web app to transfer files in a LAN and you don’t want to build a WebRTC signaling server. ↩︎
    3. You can reduce this further. In fact, people have encoded an SDP in 106 bytes! (https://webrtchacks.com/the-minimum-viable-sdp/) ↩︎

  • IPv4 Network Address Translation for Steam (NAT4S)

    TL;DR – I made Steam multiplayer possible with classic LAN games through a project called PartyLAN. It enables network address translation (NAT) between IPv4 and Steam IDs.

    Network address translation (NAT) is not an obscure concept – it has been in use since 1994. The basic idea is simple: a router, either software or hardware, takes packets from an incoming IP address (e.g., 192.168.1.123), converts it to another address (e.g., 1.2.3.4), and sends it out. The router also performs the reverse process, converting packets from the outside address (IP 1.2.3.4) to the inside address (e.g., 192.168.1.123).

    This concept is widely used, and there are several variants of NAT based on the address space it maps from and to:

    • NAT44 – the most common form of NAT, which converts between two IPv4 addresses, typically between a class A, B, or C private address space and the public IP address space (e.g., between 192.168.1.123 and 1.2.3.4). This is what home routers use.
    Illustration of NAT44 (made by Michel Bakni)
    • NAT444 – a variant of NAT44 that adds an intermediate CGNAT address space. (e.g. 192.168.1.123, then 100.89.199.129, finally to 1.2.3.4).
    • NAT64 – converts an IPv6 address to an IPv4 address and is commonly used to provide IPv4 connectivity to IPv6-only devices

    By applying the concept of NAT to Steam, which can be seen as a network with Steam user IDs as network addresses, it becomes technically feasible to perform network address translation between IPv4 and Steam IDs. I refer to this as NAT4S.

    How is this useful?

    For PC gamers, the standard method of playing multiplayer games is Steam Multiplayer. However, older games use the vanilla IP stack designed for LAN party-style multiplayer. Playing these games over the internet is challenging for non-technical individuals and often involves configuring the firewall on the home router. By implementing a network address translator that converts between IPv4 and Steam Networking, classic games can seamlessly communicate over Steam Networking.

    The Implementation

    I opted to use the CGNAT address space (100.64.0.0/10) for the mapping. Unlike traditional class A/B/C private addresses, this address space is rarely used by end-user devices.

    However, a problem arises immediately: the CGNAT address space only contains about 4 million addresses, which may seem like a lot but is significantly smaller than the number of Steam accounts, exceeding 1 billion. So, how do we accommodate 1 billion accounts with just 4 million addresses? The answer is simple: we don’t. On average, a Steam user has fewer than 100 friends, and Valve limits the number to 250. By taking the Steam ID modulo 4 million, the chances of collision are incredibly small (around 0.1%) for the average user. In the unlikely event of a collision, we increment the address by 1 until a free address is found. This IP allocation method ensures relatively stable IPs that are likely to be the same on different computers. It is also stateless, eliminating the need for a DHCP-like protocol.

  • Fixing Analog Stick Input in PPSSPP

    Fixing Analog Stick Input in PPSSPP

    PPSSPP is one of my favorite emulators. First introduced to me when I was still in high school, it is my go-to (or, only?) choice if I want to revisit some old PSP games. Though I ran into an issue that I was not able to run, only walk, diagonally in Metal Gear Solid: Peace Walker, while using a controller on Android.

    After some investigation I found out the root cause: PSP analog stick input uses max-norm (shown as p=∞ below), not Euclidean-norm (shown as p=2 below), which most other controller uses.

    In a simpler sentence: When you draw a circle using a regular controller analog stick, you get a circular input; when you draw a circle using a PSP analog stick, you get a square.

    Illustration of the unit circles of some p-norms. By QuartlOwn work, CC BY-SA 3.0, Link

    Apparently, the Android controller backend in PPSSPP did not perform this circle to square conversion, thus causing this issue. This is evidenced in the GIF below, using the PPSSPP analog stick viewer.

    Now, the easiest way of fixing this is to implement the circle to square mapping in the Android analog input backend, but that’s not the best solution. For historical reasons, the analog stick input is architected as the following

    PPSSPP 1.11 Design for Analog Input

    Analog stick mapping is done by each backend separately, with the XInput implementation being the more feature-complete one. The other ones usually have fewer features or are somewhat broken (e.g. lacking the necessary circle to square mapping). What we need is to refactor this into something more reasonable.

    A Better Analog Input Design

    This ensures that no matter which input backend you are using, you use the same, unified input mapper implementation. This ensures feature parity across all input backends. We just need to implement a correct, feature-complete unified input mapper.

    After a few hours, I have the refactor done, and it was eventually merged into master. The fix will most likely be available in the future 1.12 release of PPSSPP, and people can now have their game characters run diagonally.

  • sparsebundle-fuse: Another Implementation for Reading / Writing MacOS Sparsebundles on Linux

    There are already a sparsebundle implementation for Linux, but that’s read-only and only supports FUSE. This implementation is read / write, AND supports NBD (network block device) so the sparsebundle actually appears as a block device on the system, without you needing to loop mount the file in FUSE.

    There are some useful things that you can do with a sparsebundle, even on Linux. For example you can rsync an entire a file-system (say, XFS), without losing any metadata. Or you can abuse Google Drive by fuse mounting it and creating a full system on you Google Drive. (rootfs on Google Drive, anyone?)

    Get it here.

  • The Making of the Library Occupancy Estimation System, Part 4 – the Frontend

    The only part missing was a front-end. It is 2017, and splitting up front-end and back-end is now a must. This is even more true in this project: serving html and other resources from my free Heroku server does not sound like a good plan – with only 1 web instance, the server can be easily saturated. So the plan was to host the front-end on GitHub.

    The frameworks I chose for this job is Vue for MVVM and MaterializeCSS for the appearance. The reason for using Vue instead of React and Angular was Vue is more suited for small project like this, and is extremely easy to setup (include a js file, add 5 lines of code and Vue is ready). The reason for using MaterializeCSS was simply because it looks nice.

    A few hours later:

    The front-end is pretty bare-bones (< 100 SLOC of js), but it does the job. And thanks to MaterializeCSS, it doesn’t look half bad. The page is also responsive (again, thank you MaterializeCSS).

    The front-end already looks pretty nice on phones, so I took a step further to make it an iOS Web App (no I don’t want to pay $99/year to make it an actual iOS App).

    The first thing to do when developing a mobile app is of course to design an app icon.

    It won’t get me any design award but hey, it’s an icon.

    The tricky part of making the iOS Web App is trying to make it act like a native app. Some CSS magic was used to make it app-like. Also I spend I lot of time working around an iOS bug that made the entire html scroll and bounce even if I told it not to… A few failed attempts later I gave in and used a library called iNoBounce. That worked well.

    How the icon looks on home screen:

    Good enough.

    Frontend Code on GitHub