Make is traditionally used to build artifacts from program source code. It can also be used for other tasks, where you need to “build” something out of a “source-of-truth”.
For example: video-editing. I personally find ffmpeg able to generate better quality compressed videos than FCPX or Premiere Pro, which is especially important if the desired bitrate is low. One of the use cases is this website, which has a video background. It is important to keep the video size as small as possible for video to load in a reasonable amount of time, while maintaining an acceptable quality. FCPX unfortunately cannot do that.
I can use a shell script of course. But it occurred to me that, make is actually the perfect tool for the job, if you treat the master video as the source file, and the resultant compressed videos as the artifacts.
TL;DR: It’s possible to mine Ethereum on a M1 Mac GPU. Hashrate is about 2Mh/s.
Mining on a M1 Mac
I’ve had my M1 MacBook Air for a bit of time now, and I also recently started mining Ethereum. I can’t help asking myself: What’s Ethereum mining performance like on a M1 Mac?
The obvious thing to do first is to run the off-the-shelf ethminer, which gives the following error:
ethminer 0.19.0-alpha.0
Build: darwin/release/appleclang

Unrecognized platform Apple
Error: No usable mining devices found
Not good. Apparently Apple GPUs are not whitelisted in ethminer. That should be easy to fix. Relevant lines are in libethash-cl/CLMiner.cpp, and I added Apple GPUs to the whitelist, pretending it’s an Intel GPU.
Then boost won’t compile since it’s trying to compile with a -fcoalesce-templates argument, which doesn’t exist in recent clang versions. So I have to update boost to the latest version, and fix relevant asio code since ethminer was using deprecated asio APIs.
I also need to upgrade OpenSSL to the latest version to have it support darwin + arm64.
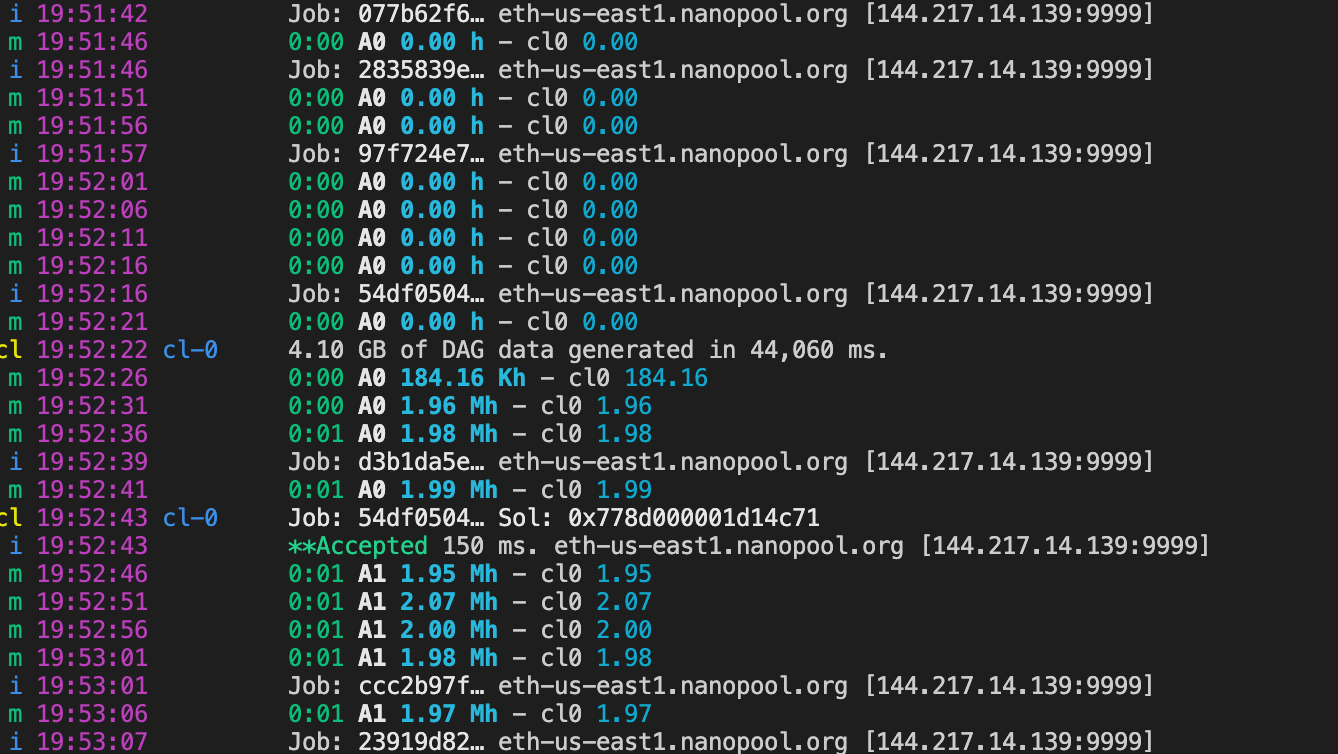
After getting everything to compile. Here’s the result:
ethminer 0.19.0-17+commit.ce52c740.dirty
Build: darwin/release/appleclang

 i 19:51:36          Configured pool eth-us-east1.nanopool.org:9999
 i 19:51:36          Selected pool eth-us-east1.nanopool.org:9999
 i 19:51:36          Connection remotely closed by eth-us-east1.nanopool.org
 i 19:51:36          Stratum mode : EthereumStratum/1.0.0 (NiceHash)
 i 19:51:36          Established connection to eth-us-east1.nanopool.org [144.217.14.139:9999]
 i 19:51:36          Spinning up miners...
cl 19:51:36 cl-0     Using Device : Intel GPU 0.0 Apple M1 OpenCL 1.2  Memory : 10.67 GB (11453251584 B)
 i 19:51:36          Extranonce set to 778d
 i 19:51:36          Extranonce set to 778d
 i 19:51:36          Authorized worker [REDACTED]
 i 19:51:36          Epoch : 397 Difficulty : 10.00 Gh
 i 19:51:36          Job: c7fc5311… eth-us-east1.nanopool.org [144.217.14.139:9999]
cl 19:51:38 cl-0     Generating split DAG + Light (total): 4.10 GB
 i 19:51:38          Job: 40a57756… eth-us-east1.nanopool.org [144.217.14.139:9999]
cl 19:51:38 cl-0     OpenCL kernel
cl 19:51:38 cl-0     Creating DAG buffer, size: 4.10 GB, free: 6.57 GB
cl 19:51:38 cl-0     Creating light cache buffer, size: 65.62 MB
cl 19:51:38 cl-0     Loading kernels
cl 19:51:38 cl-0     Creating buffer for header.
cl 19:51:38 cl-0     Creating mining buffer
 m 19:51:41          0:00 A0 0.00 h - cl0 0.00
 i 19:51:42          Job: 077b62f6… eth-us-east1.nanopool.org [144.217.14.139:9999]
 m 19:51:46          0:00 A0 0.00 h - cl0 0.00
 i 19:51:46          Job: 2835839e… eth-us-east1.nanopool.org [144.217.14.139:9999]
 m 19:51:51          0:00 A0 0.00 h - cl0 0.00
 m 19:51:56          0:00 A0 0.00 h - cl0 0.00
 i 19:51:57          Job: 97f724e7… eth-us-east1.nanopool.org [144.217.14.139:9999]
 m 19:52:01          0:00 A0 0.00 h - cl0 0.00
 m 19:52:06          0:00 A0 0.00 h - cl0 0.00
 m 19:52:11          0:00 A0 0.00 h - cl0 0.00
 m 19:52:16          0:00 A0 0.00 h - cl0 0.00
 i 19:52:16          Job: 54df0504… eth-us-east1.nanopool.org [144.217.14.139:9999]
 m 19:52:21          0:00 A0 0.00 h - cl0 0.00
cl 19:52:22 cl-0     4.10 GB of DAG data generated in 44,060 ms.
 m 19:52:26          0:00 A0 184.16 Kh - cl0 184.16
 m 19:52:31          0:00 A0 1.96 Mh - cl0 1.96
 m 19:52:36          0:01 A0 1.98 Mh - cl0 1.98
 i 19:52:39          Job: d3b1da5e… eth-us-east1.nanopool.org [144.217.14.139:9999]
 m 19:52:41          0:01 A0 1.99 Mh - cl0 1.99
cl 19:52:43 cl-0     Job: 54df0504… Sol: 0x778d000001d14c71
 i 19:52:43          **Accepted 150 ms. eth-us-east1.nanopool.org [144.217.14.139:9999]
 m 19:52:46          0:01 A1 1.95 Mh - cl0 1.95
 m 19:52:51          0:01 A1 2.07 Mh - cl0 2.07
 m 19:52:56          0:01 A1 2.00 Mh - cl0 2.00
 m 19:53:01          0:01 A1 1.98 Mh - cl0 1.98
 i 19:53:01          Job: ccc2b97f… eth-us-east1.nanopool.org [144.217.14.139:9999]
 m 19:53:06          0:01 A1 1.97 Mh - cl0 1.97
 i 19:53:07          Job: 23919d82… eth-us-east1.nanopool.org [144.217.14.139:9999]
^C i 19:53:10 main     Got interrupt ...
 i 19:53:10 main     Disconnected from eth-us-east1.nanopool.org [144.217.14.139:9999]
 i 19:53:10 main     Shutting down miners...
 i 19:53:16 main     Terminated!
I’ve recently made LAN Party VPN. It makes playing LAN games with friends on Discord effortless. LPVPN is written in C++, mostly because Discord SDK is only available in C, C++ and C#. So I didn’t have much of an option here.
The idea of LPVPN is rather simple, get IP packets from WinTun (the Windows implementation of TUN by WireGuard), and send those using the Discord SDK, and of course the other way around. There were still a few things left on the table: IP assignment and package routing. Both of these were implemented in the most straight-forward way possible. A minimal GUI is slapped on to LPVPN to make everything a little bit more user friendly.
I did ran into a few problems though:
Problem 1: Windows Firewall
Windows by default sets a network as “Public” with no easy way to reconfigure. A network interface being set to the “Public” profile gives Windows PCs a little bit more safety when connected to public networks. But in this case it totally destroys the intended use-case: LAN gaming. When a network is set to “Public”, other parties cannot connect to services on that interface, even if it listens to 0.0.0.0. This means that if you will not be able to find and connect to games other people are hosting. I’m able to work around this using this API, which is able to set a network as “Private”.
Problem 2: Packing everything into a single binary
I want users to download a standalone exe file, double click it, and have the VPN running. This proved to be a little bit hard since I need to bundle 2 dlls with the main binary: one for WinTun, and one for Discord. I want to package everything into a single binary since I don’t want users to download a ZIP file and manually unzip. For this I used NSIS, which is usually used for creating software installer. In this case I used it as a way to automatically unpack the dlls and exe and then execute in a temporary directory. This works on paper until I run into problem 3.
Problem 3: Windows Defender False Positives
Unfortunately, as soon as I have the NSIS executable packaged. Windows Defender promptly deleted it from my computer and gave me a stern warning that it is a Trojan. (It’s kind of funny to see Windows do that.) This would not fly if I plan on distributing the software.
Problem 4: Problem 2, Electric Boogaloo
Since there’s really no easy way to fix problem 3. I have think of another way to solve problem 2. Fortunately I found MemoryModule, which is a reimplementation of LoadLibrary and its friends in Windows. This means I can load dlls from memory, instead of from files. I ended up packing the dlls as resources using cmrc, and then loading them using MemoryModule. This fixed the false positives from Windows Defender.
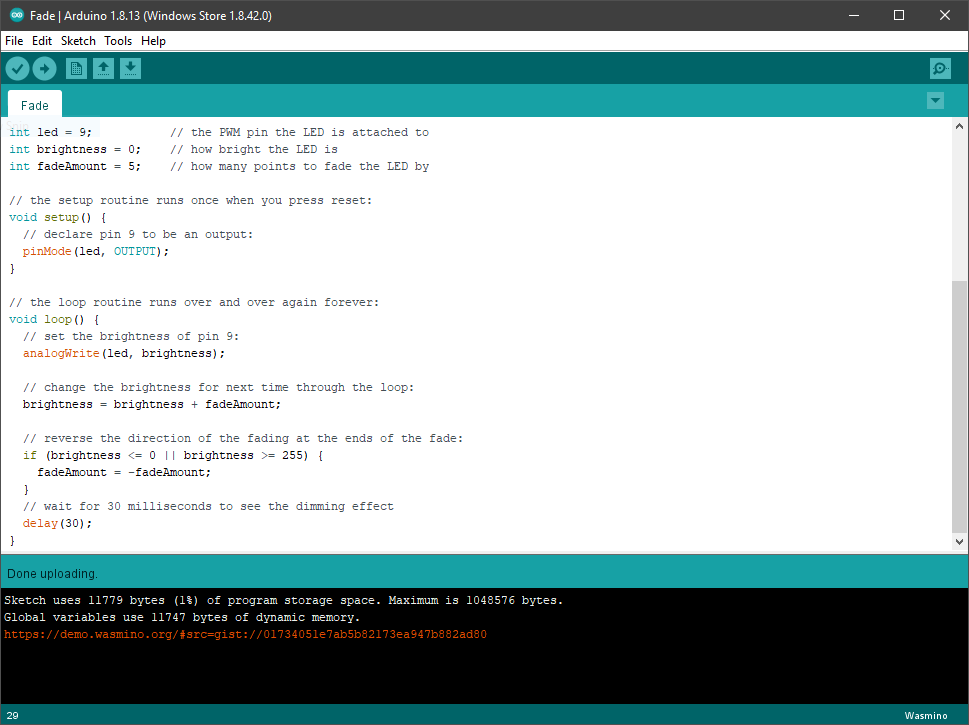
Wasmino is an Arduino core fully compatible with the Arduino IDE. It allows you to compile your Arduino sketch to WebAssembly and run it in a browser, all using the Arduino IDE.
Showcase
This is the off-the-shelf “Fade” example in the Arduino IDE.
/*
  Fade

  This example shows how to fade an LED on pin 9 using the analogWrite()
  function.

  The analogWrite() function uses PWM, so if you want to change the pin you're
  using, be sure to use another PWM capable pin. On most Arduino, the PWM pins
  are identified with a "~" sign, like ~3, ~5, ~6, ~9, ~10 and ~11.

  This example code is in the public domain.

  http://www.arduino.cc/en/Tutorial/Fade
*/

int led = 9;           // the PWM pin the LED is attached to
int brightness = 0;    // how bright the LED is
int fadeAmount = 5;    // how many points to fade the LED by

// the setup routine runs once when you press reset:
void setup() {
  // declare pin 9 to be an output:
  pinMode(led, OUTPUT);
}

// the loop routine runs over and over again forever:
void loop() {
  // set the brightness of pin 9:
  analogWrite(led, brightness);

  // change the brightness for next time through the loop:
  brightness = brightness + fadeAmount;

  // reverse the direction of the fading at the ends of the fade:
  if (brightness <= 0 || brightness >= 255) {
    fadeAmount = -fadeAmount;
  }
  // wait for 30 milliseconds to see the dimming effect
  delay(30);
}
You can see it compiled to WASM and running here:
(Click the “Run” button and the LED should start to animate)
Disclaimer: The toolchain is only tested on Windows (x86-64) and Linux (x86-64), and probably will work for MacOS. It 100% won’t work on 32bit systems since some dependencies (WASI and Binaryen) are 64bit only.
Install “Wasmino Virtual Boards” in Tools -> Board -> Board Manager. Select Wasmino as as target board.
Write some Arduino code, click upload, and an URL will be generated for you. (If you are uploading for the first time, it will ask you to login to your GitHub account. It uses GitHub Gist for saving the compiled WASM binary. The login times out in 60 seconds.)
Paste that URL into your browser and use the UI to add LEDs or toggle switches. The URL will automatically update as you make changes. You can then copy the resulting URL in the browser and share it with other people.
Caveats
The Wasmino should be viewed as having an infinitely fast CPU, and operations other than delay and delayMicroseconds do not take any CPU time. Calling time functions micros and millis should reflect this. IO can only happen during sleep, therefore you cannot do
while (!digitalRead(2)) {} // this will hang the browser tab
and should do this instead
while (!digitalRead(2)) {
    delay(50);
}
Having a infinitely fast CPU also means that interrupts will only happen during delay and delayMicroseconds. It is still good practice to use noInterrupts and interrupts to protect critical sections if you plan to use your code on real hardware.
Other caveats exist such as the lack of BUILTIN_LED macro since Wasmino, being virtual, doesn’t have a built-in LED.
What works and what doesn’t work
From: https://www.arduino.cc/reference/en/

y: working
n: not working

Digital I/O
y   digitalRead()
y   digitalWrite()
y   pinMode()
Analog I/O
y*  analogRead()
n   analogReference()
y   analogWrite()
Zero, Due & MKR Family
n   analogReadResolution()
n   analogWriteResolution()
Advanced I/O
n   noTone()
n   pulseIn()
n   pulseInLong()
n   shiftIn()
n   shiftOut()
n   tone()
Time
y   delay()
y   delayMicroseconds()
y   micros()
y   millis()
Math
y   abs()
y   constrain()
y   map()
y   max()
y   min()
y   pow()
y   sq()
y   sqrt()
Trigonometry
y   cos()
y   sin()
y   tan()
Characters
n   isAlpha()
n   isAlphaNumeric()
n   isAscii()
n   isControl()
n   isDigit()
n   isGraph()
n   isHexadecimalDigit()
n   isLowerCase()
n   isPrintable()
n   isPunct()
n   isSpace()
n   isUpperCase()
n   isWhitespace()
Random Numbers
n   random()
n   randomSeed()
Bits and Bytes
y   bit()
y   bitClear()
y   bitRead()
y   bitSet()
y   bitWrite()
y   highByte()
y   lowByte()
External Interrupts
y   attachInterrupt()
y   detachInterrupt()
Interrupts
y   interrupts()
y   noInterrupts()
Communication
y*  Serial
y   Stream
USB
n   Keyboard
n   Mouse

*   Not exposed in the demo web app.
*   Not exposed in the demo web app.
Pretty much the same idea as the previous attempt, but with graphite sheets to conduct heat better (I’m using Panasonic PGS sheets). This is 100% not recommended because the graphite sheets are conductive, and are more likely to cause damage.
PH0 Screw Driver (it must be PH0, anything else won’t do)
Tweezers (Optional, but nice to have)
Thermal Pads (1mm thick, preferably uncut)
Thermal Pads (2mm thick, preferably uncut)
Scissors (to cut the thermal pads)
Disclaimer
If you break your camera, it’s not my fault. I also don’t guarantee it will stop overheating in your environment as it depends greatly on the ambient temperature. Adding a fan will almost certainly help.
Disassembly
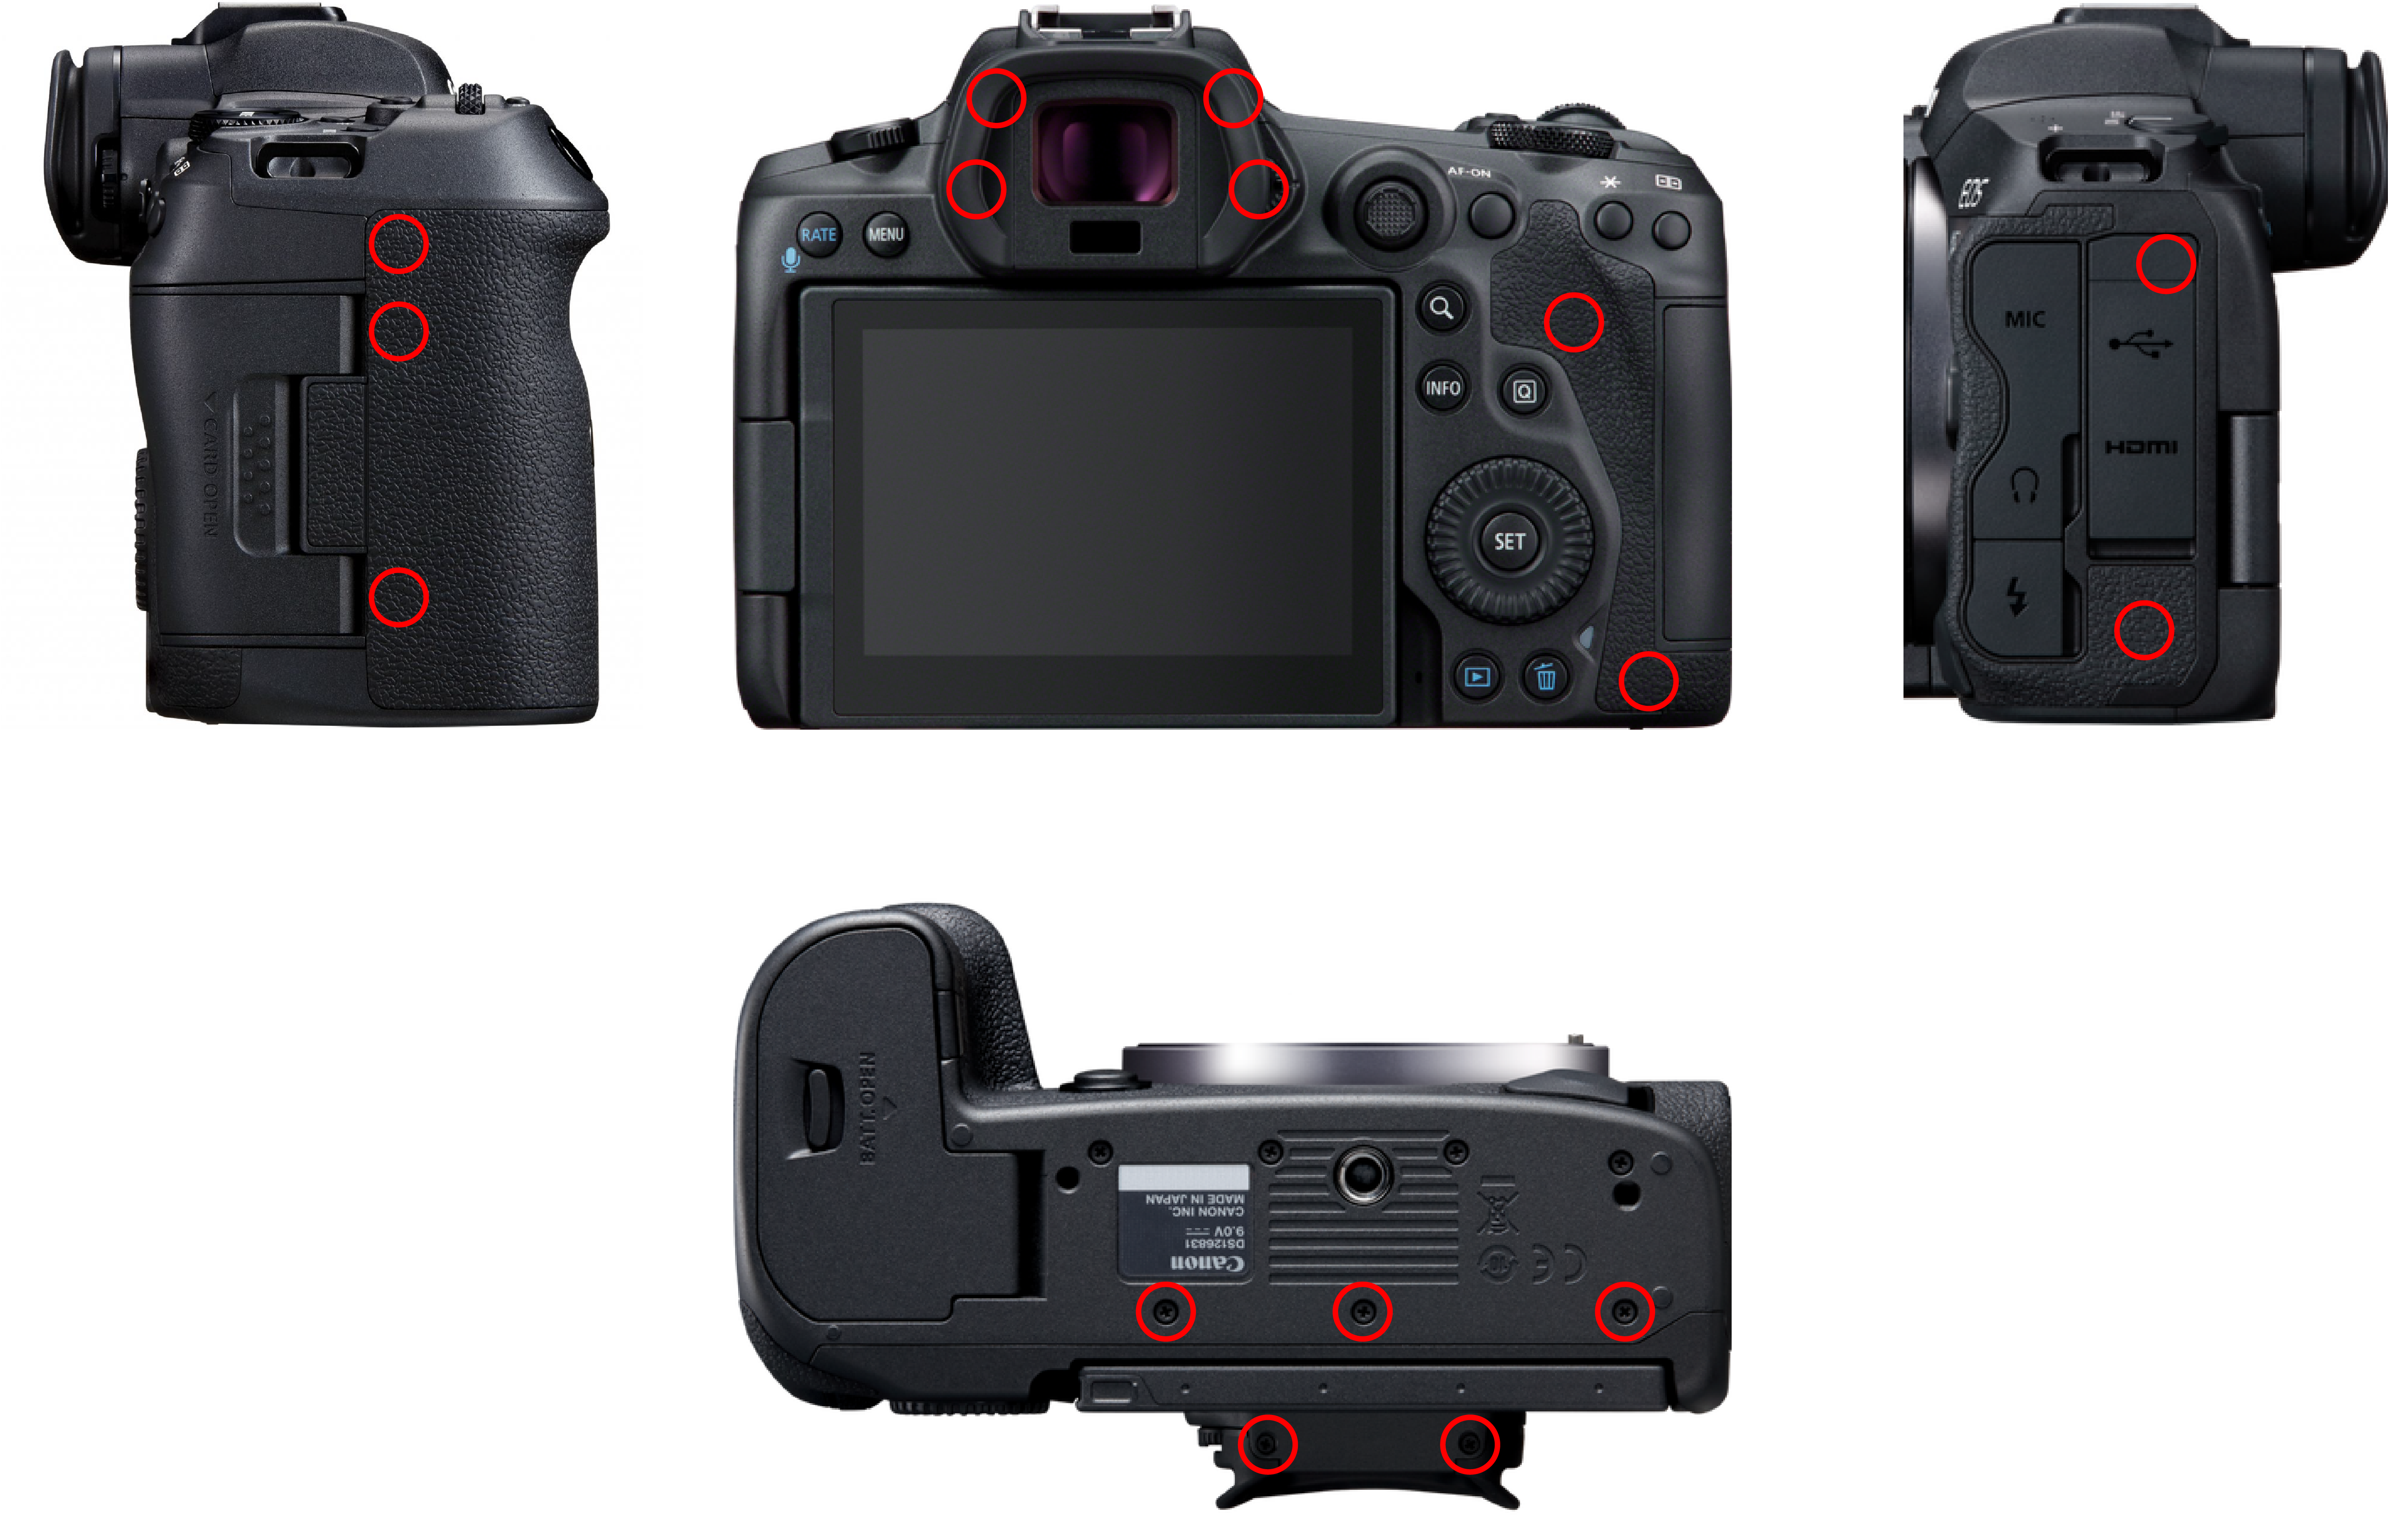
Remove these screws.
I recommend removing the screws in the order of bottom -> left -> right -> front. If the screws are not visible, they are either under the faux-leather cover (which you can pry up with your finger nails, you don’t need to fully remove the faux-leather to get to the screws), or under the eye-piece cover, which is held in with two screws.
I also recommend printing out the image above, and place the screws in the red circles as you go.
After you removed these screws, SLOWLY lift up the front panel by the card slot and the screen hinge. It may take a little force to dislodge, but it shouldn’t be very hard. There’s one flex cable to disconnect, make sure it’s fully disconnected before it fully comes apart.
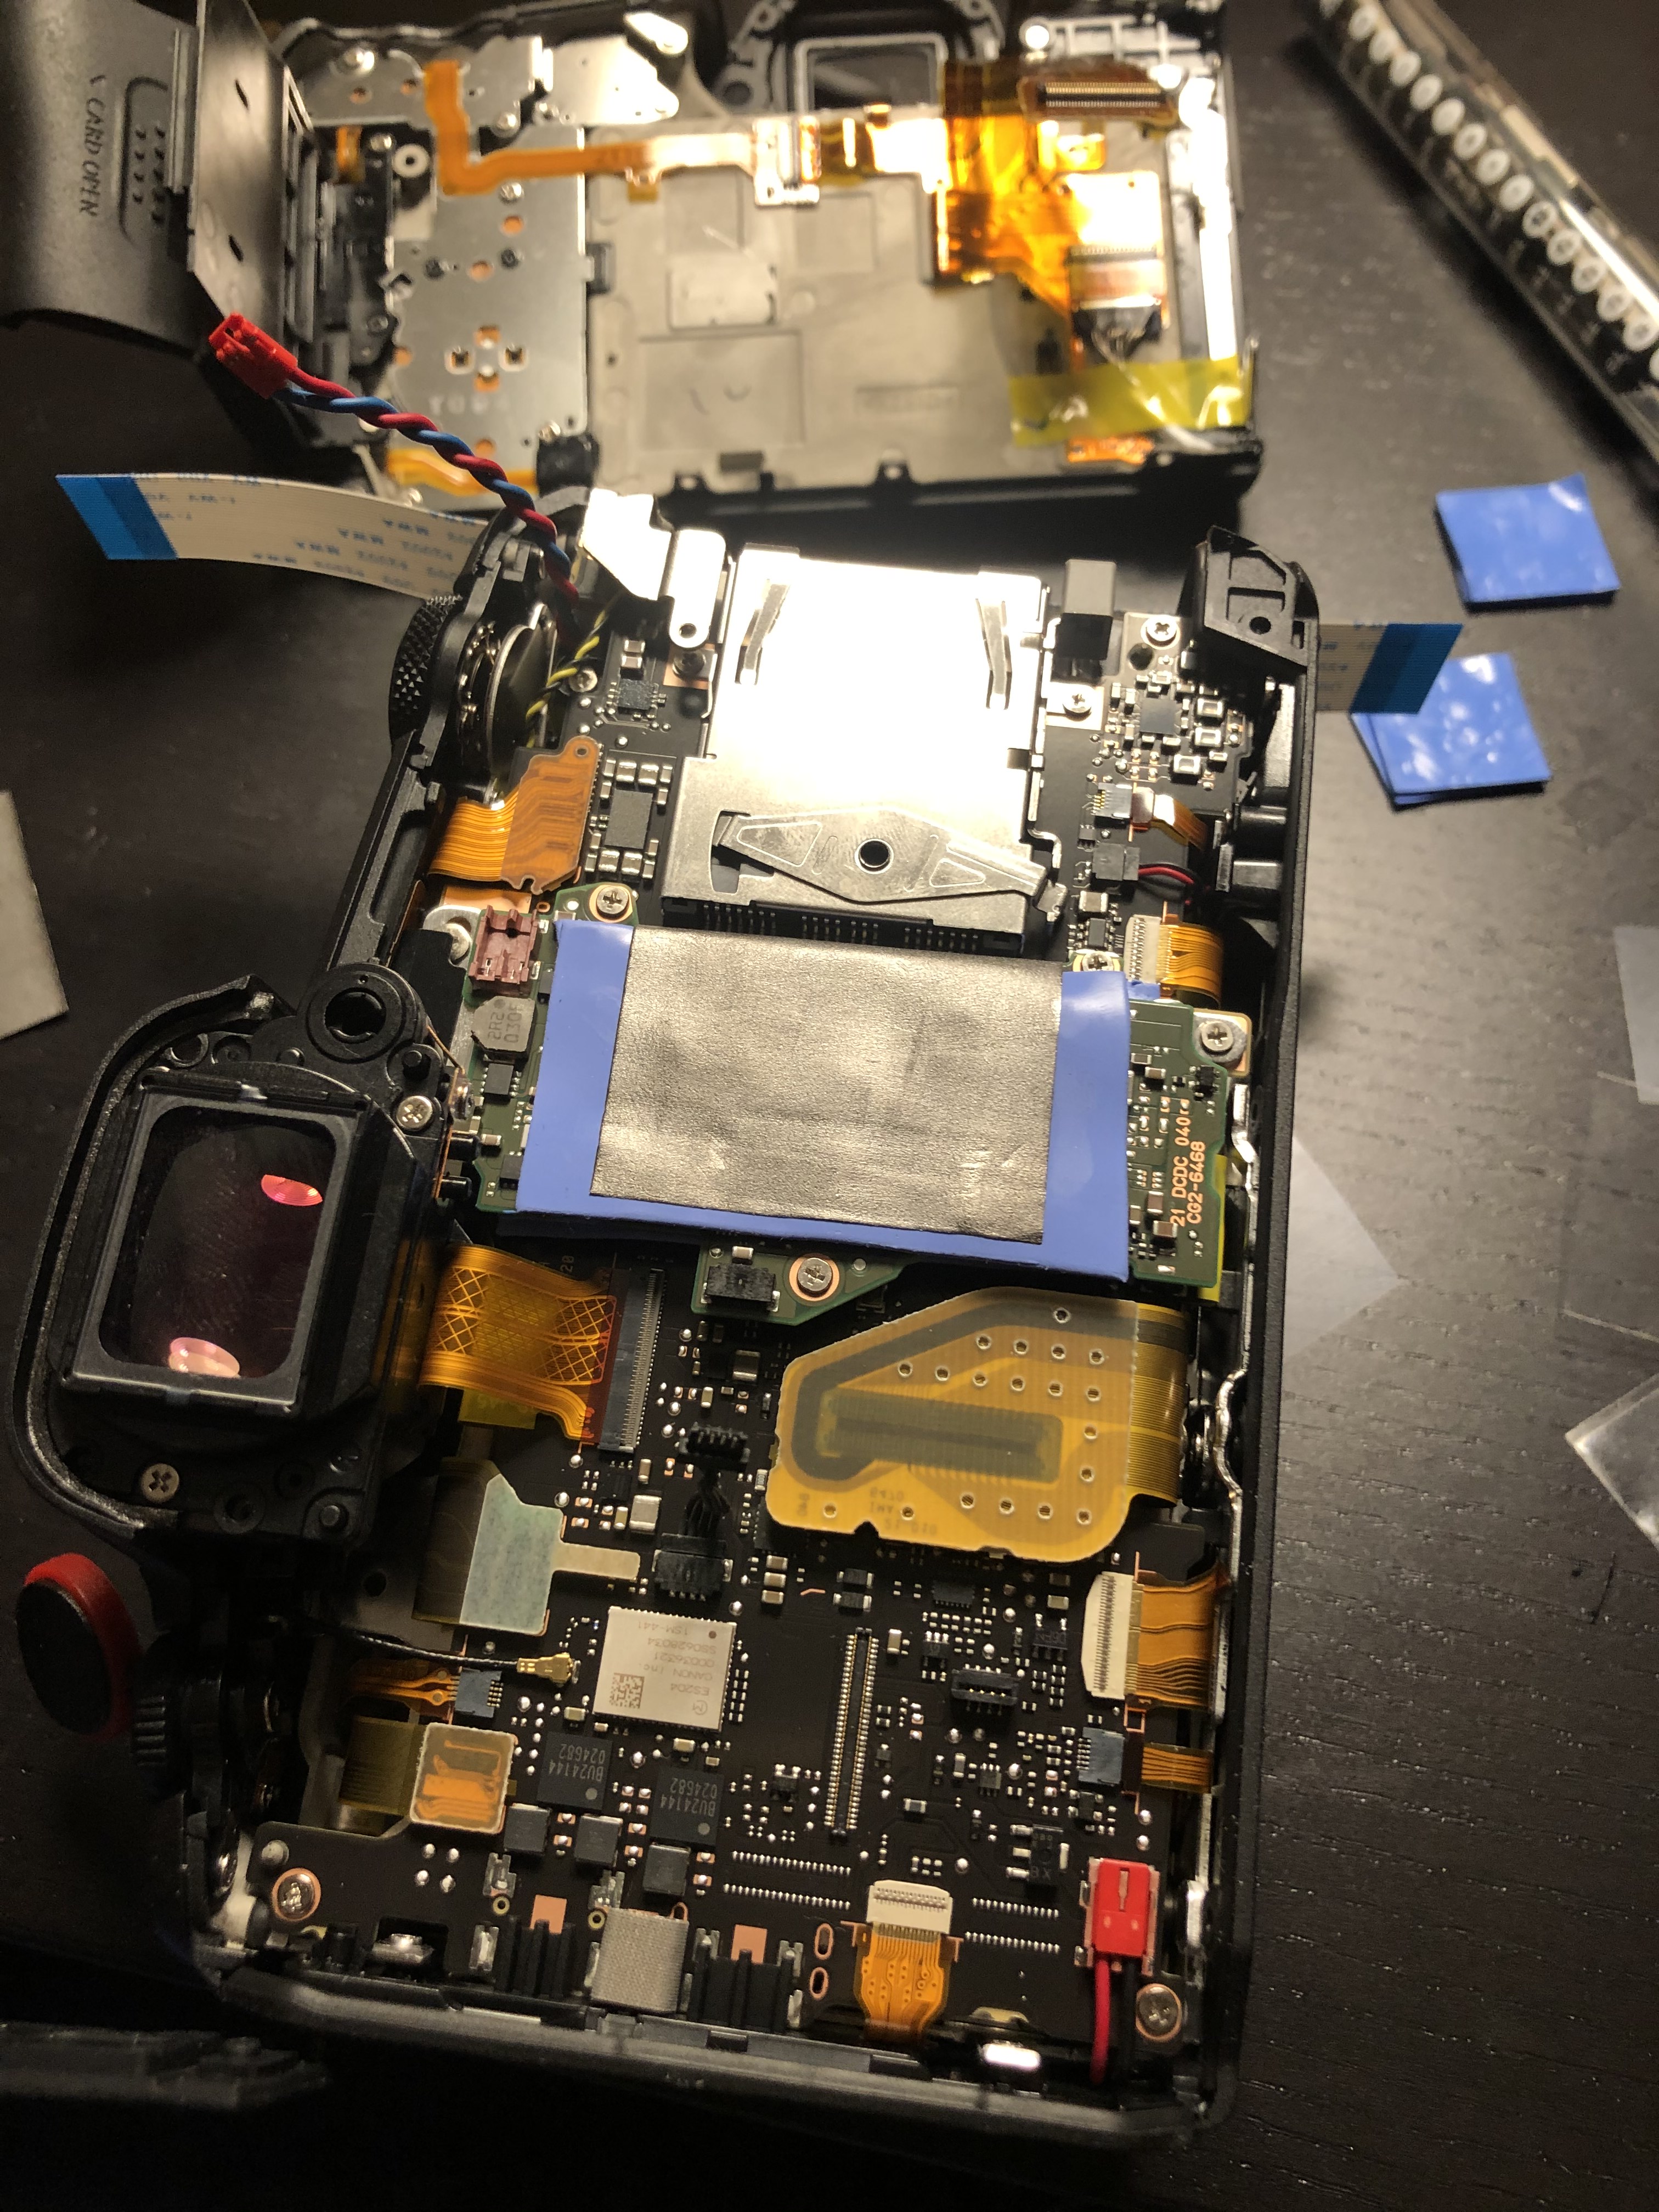
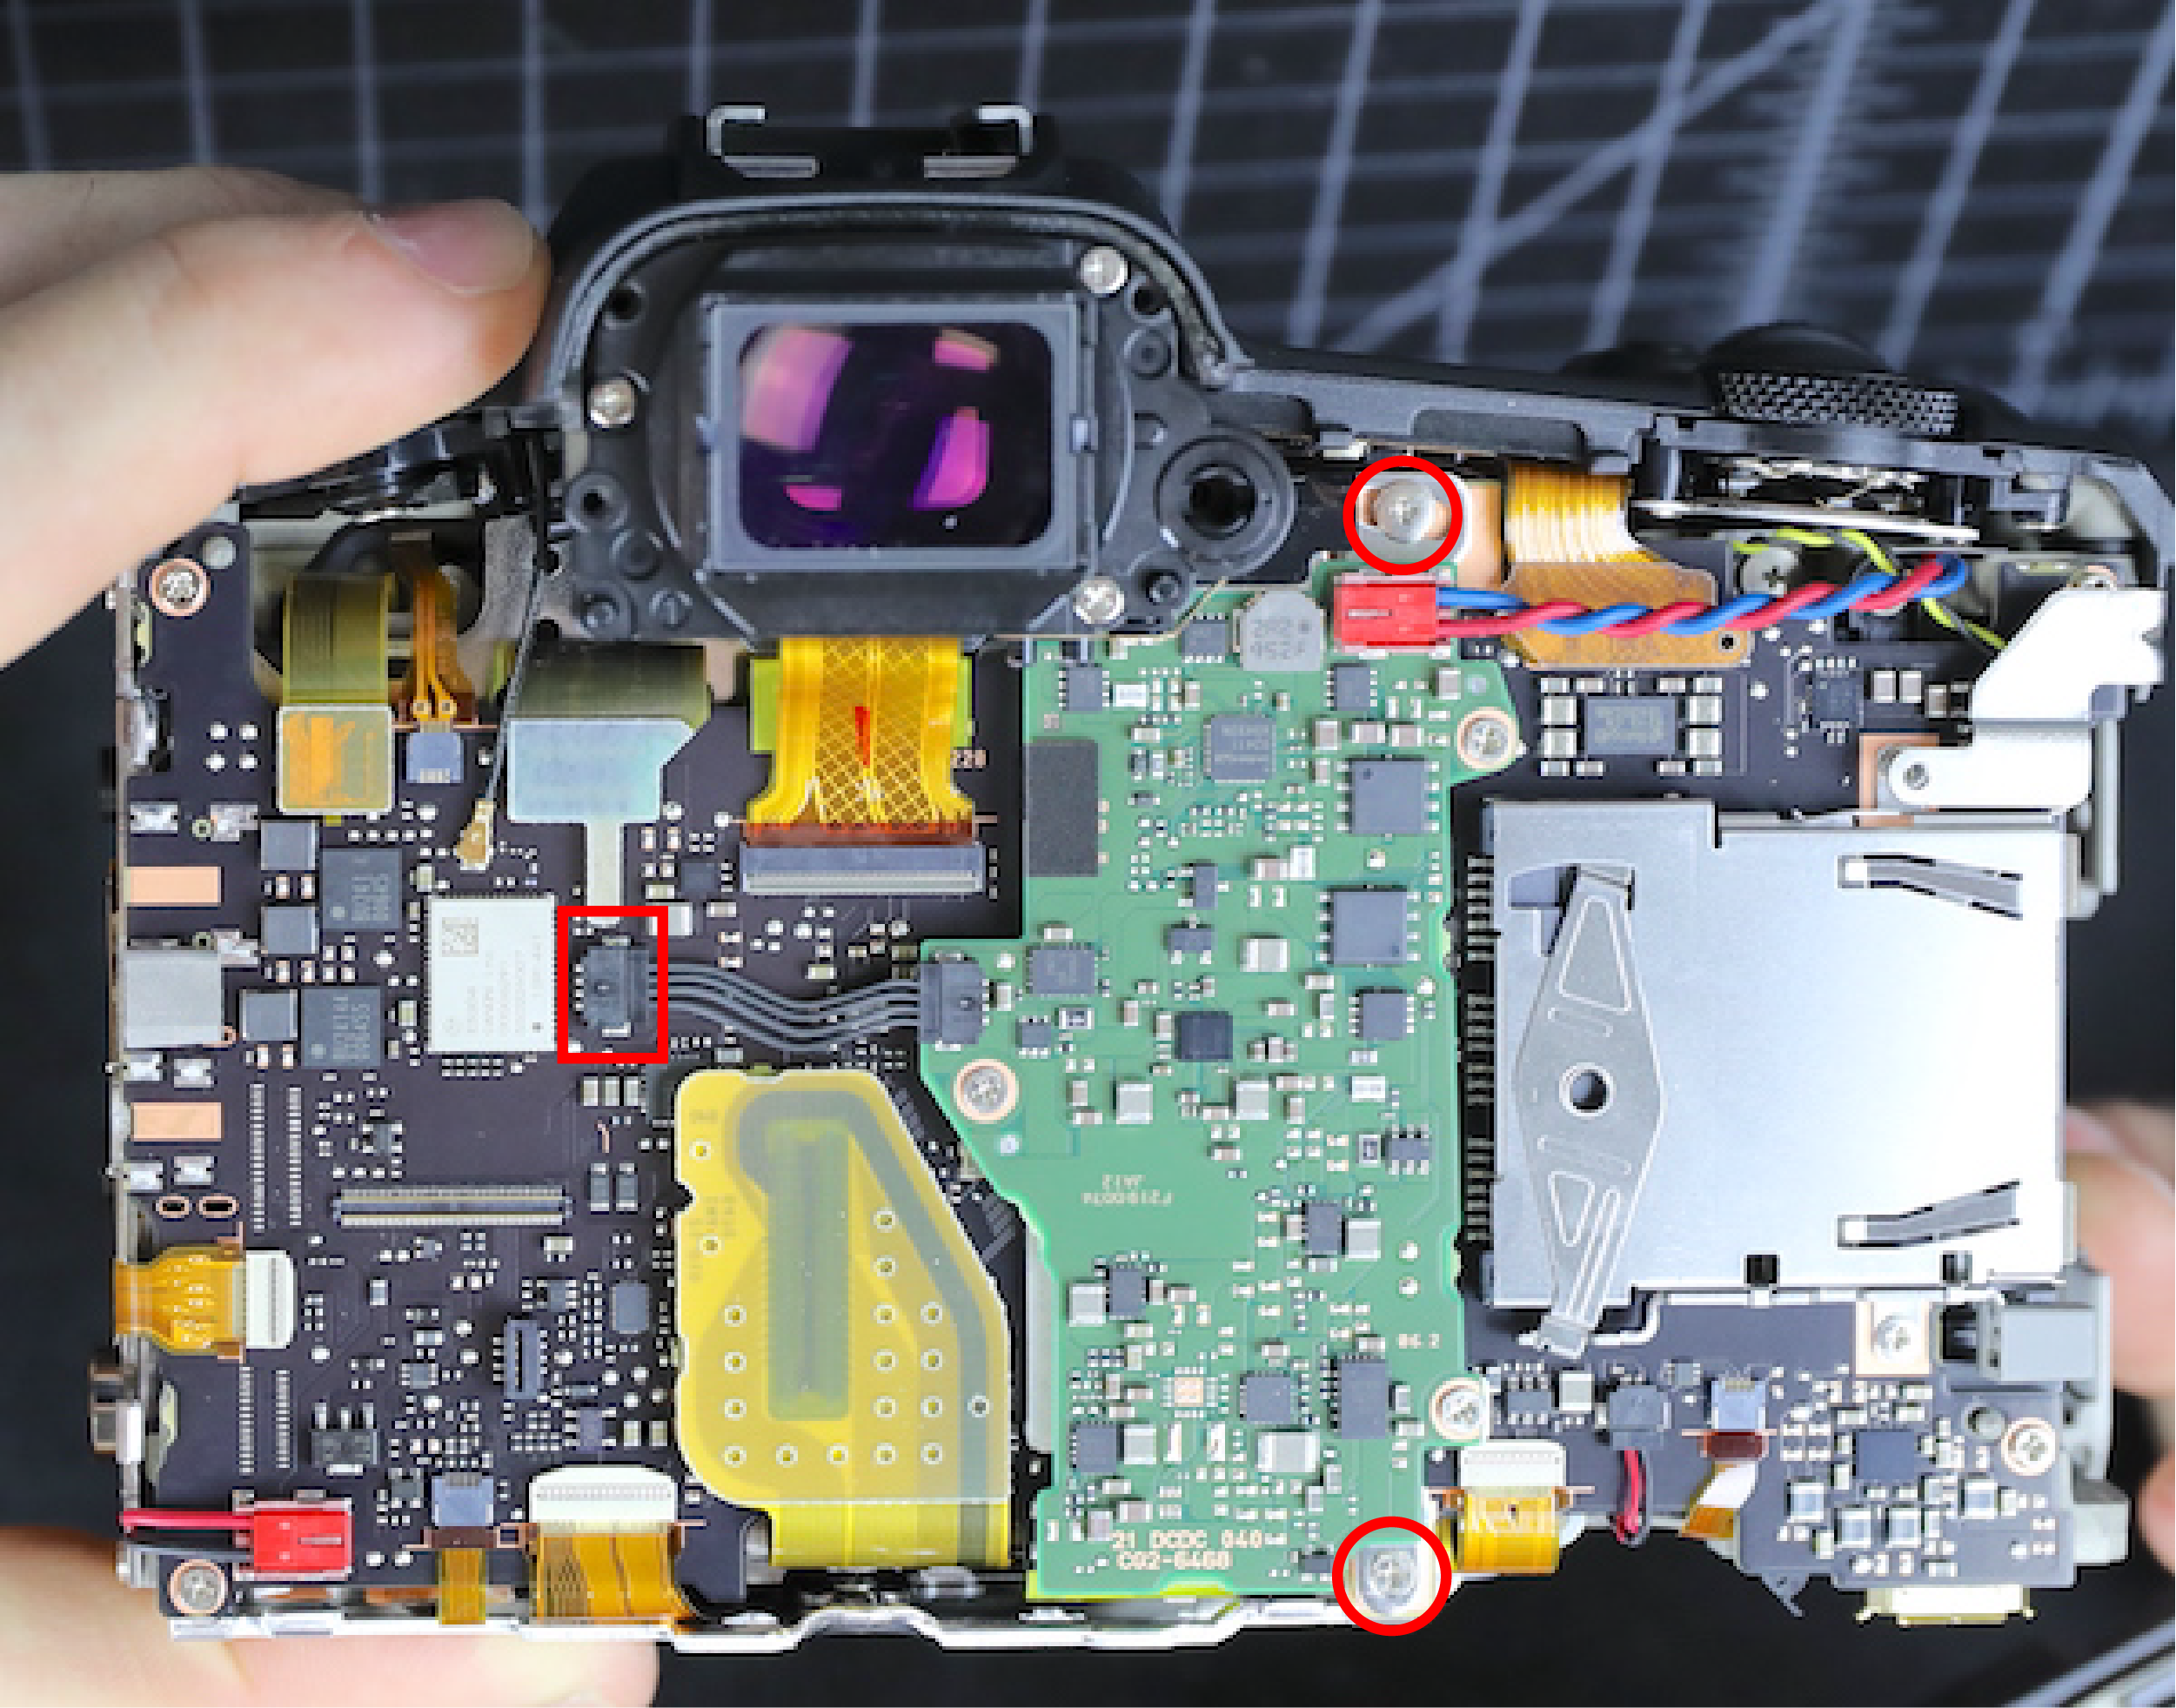
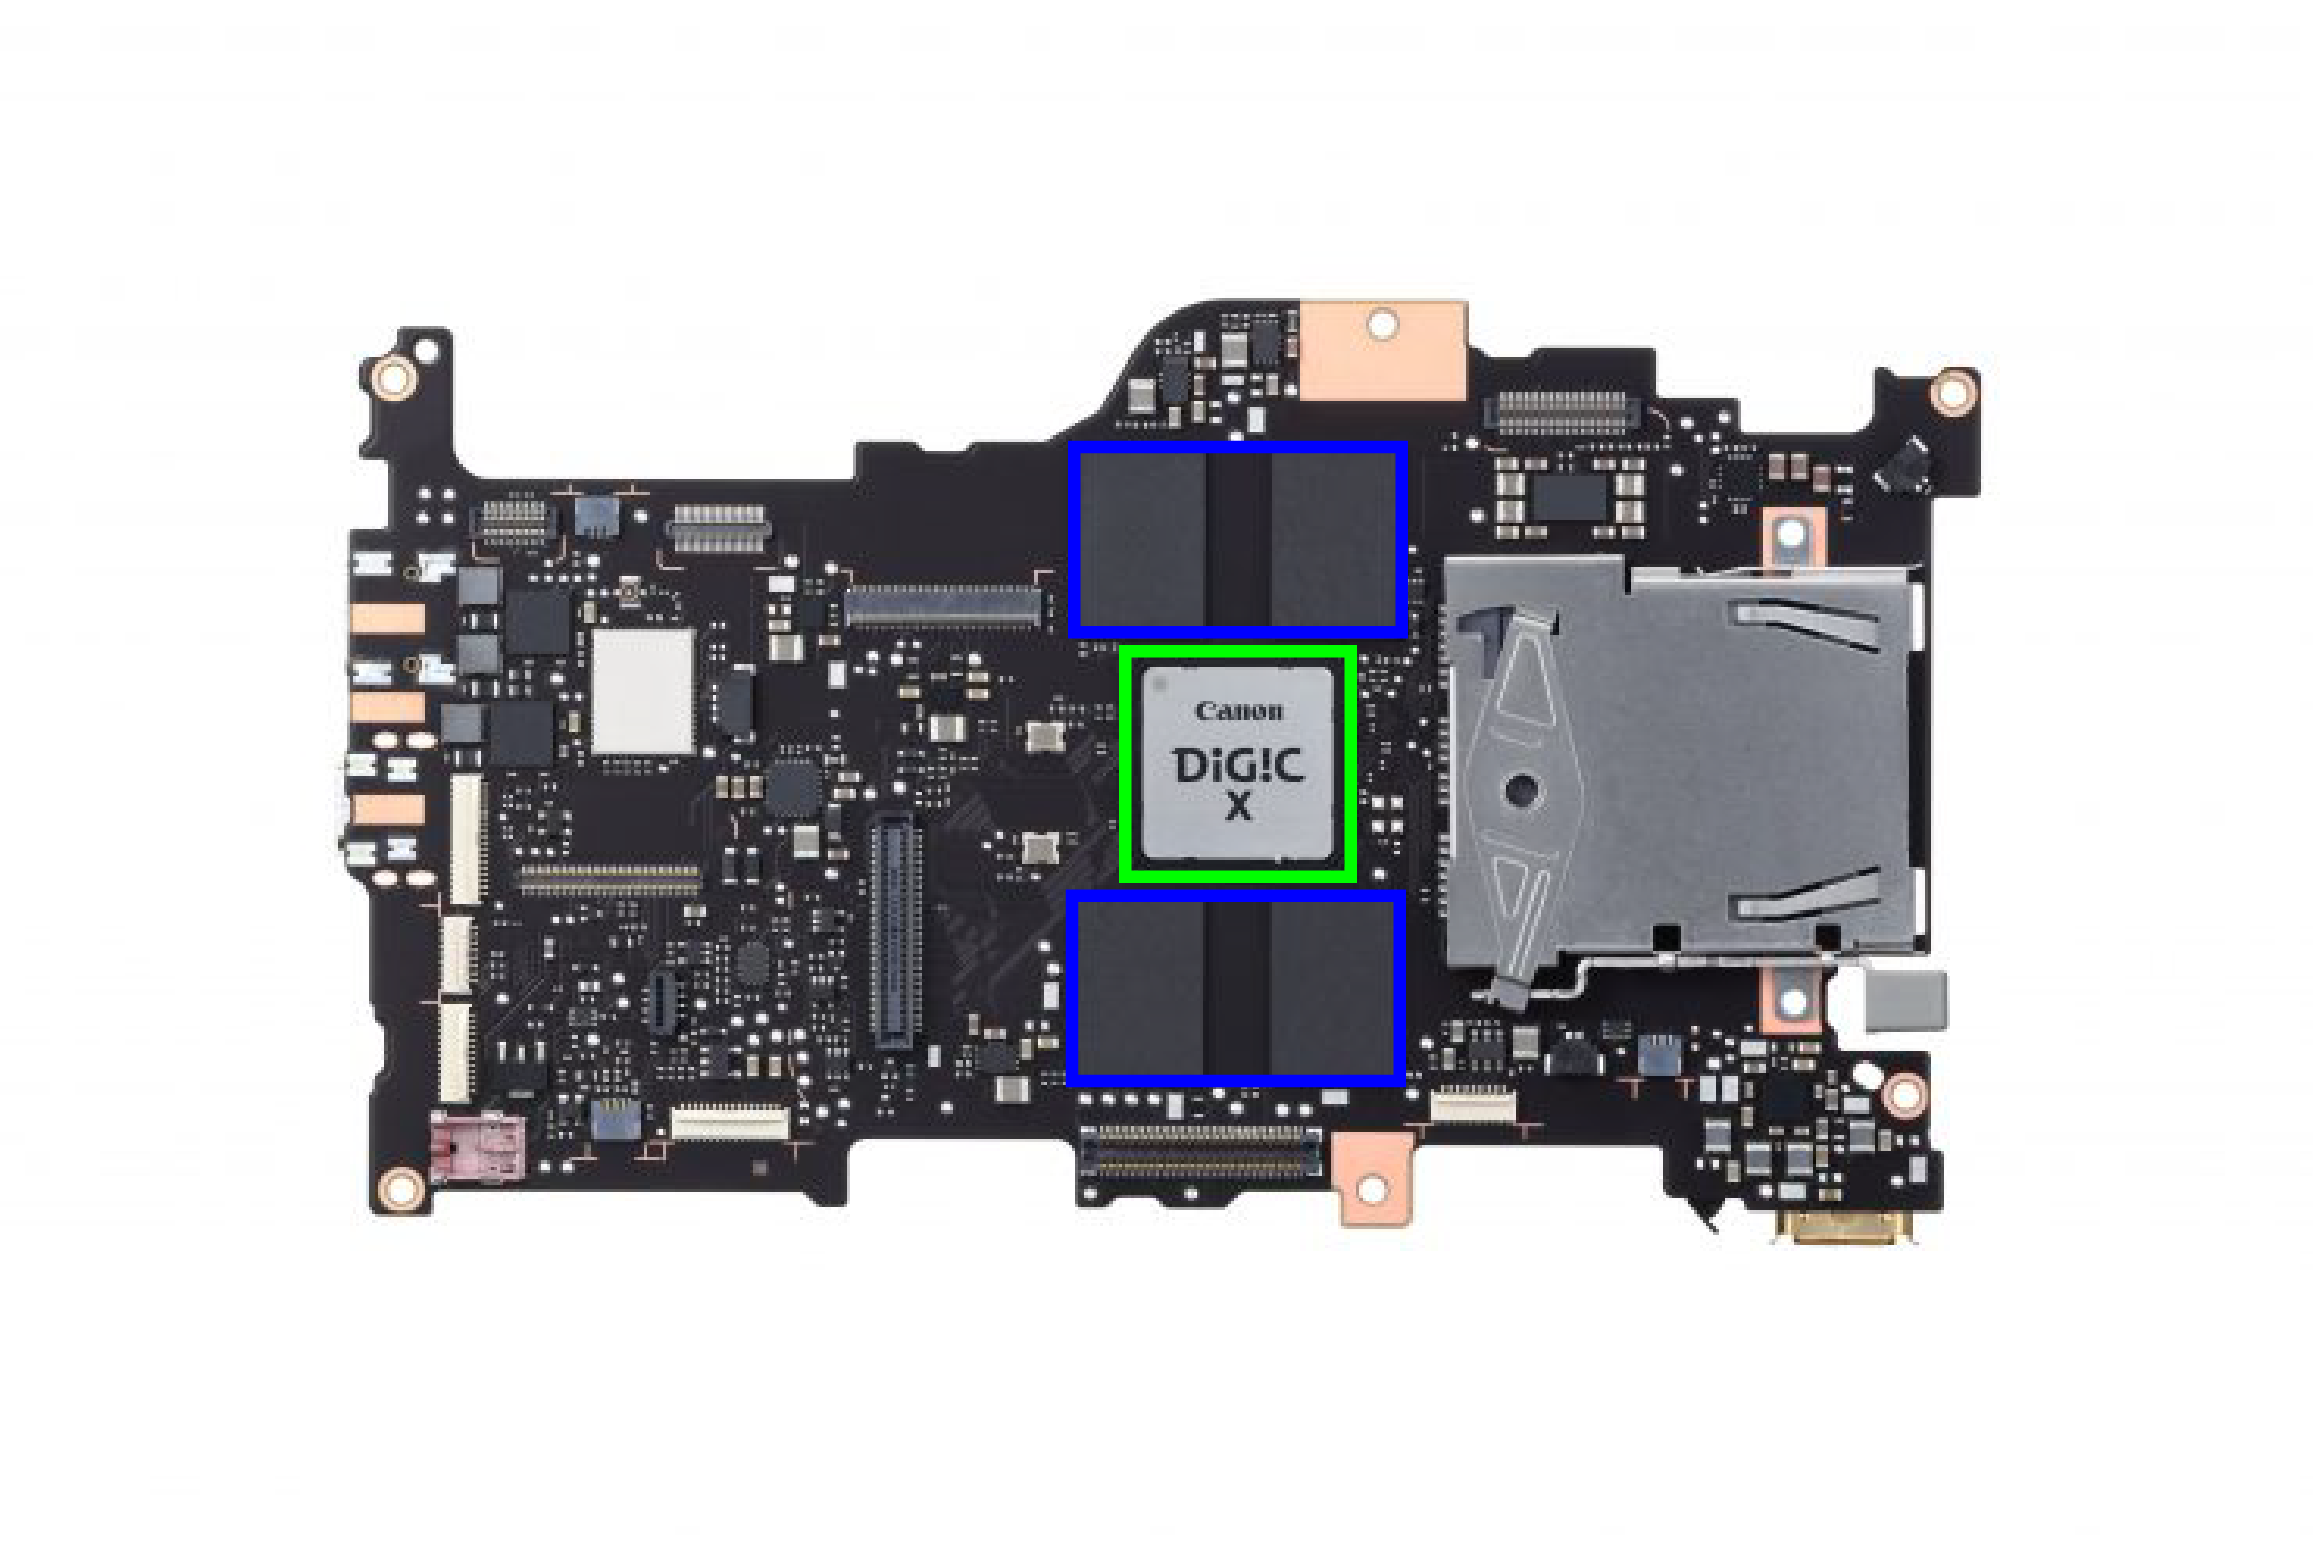
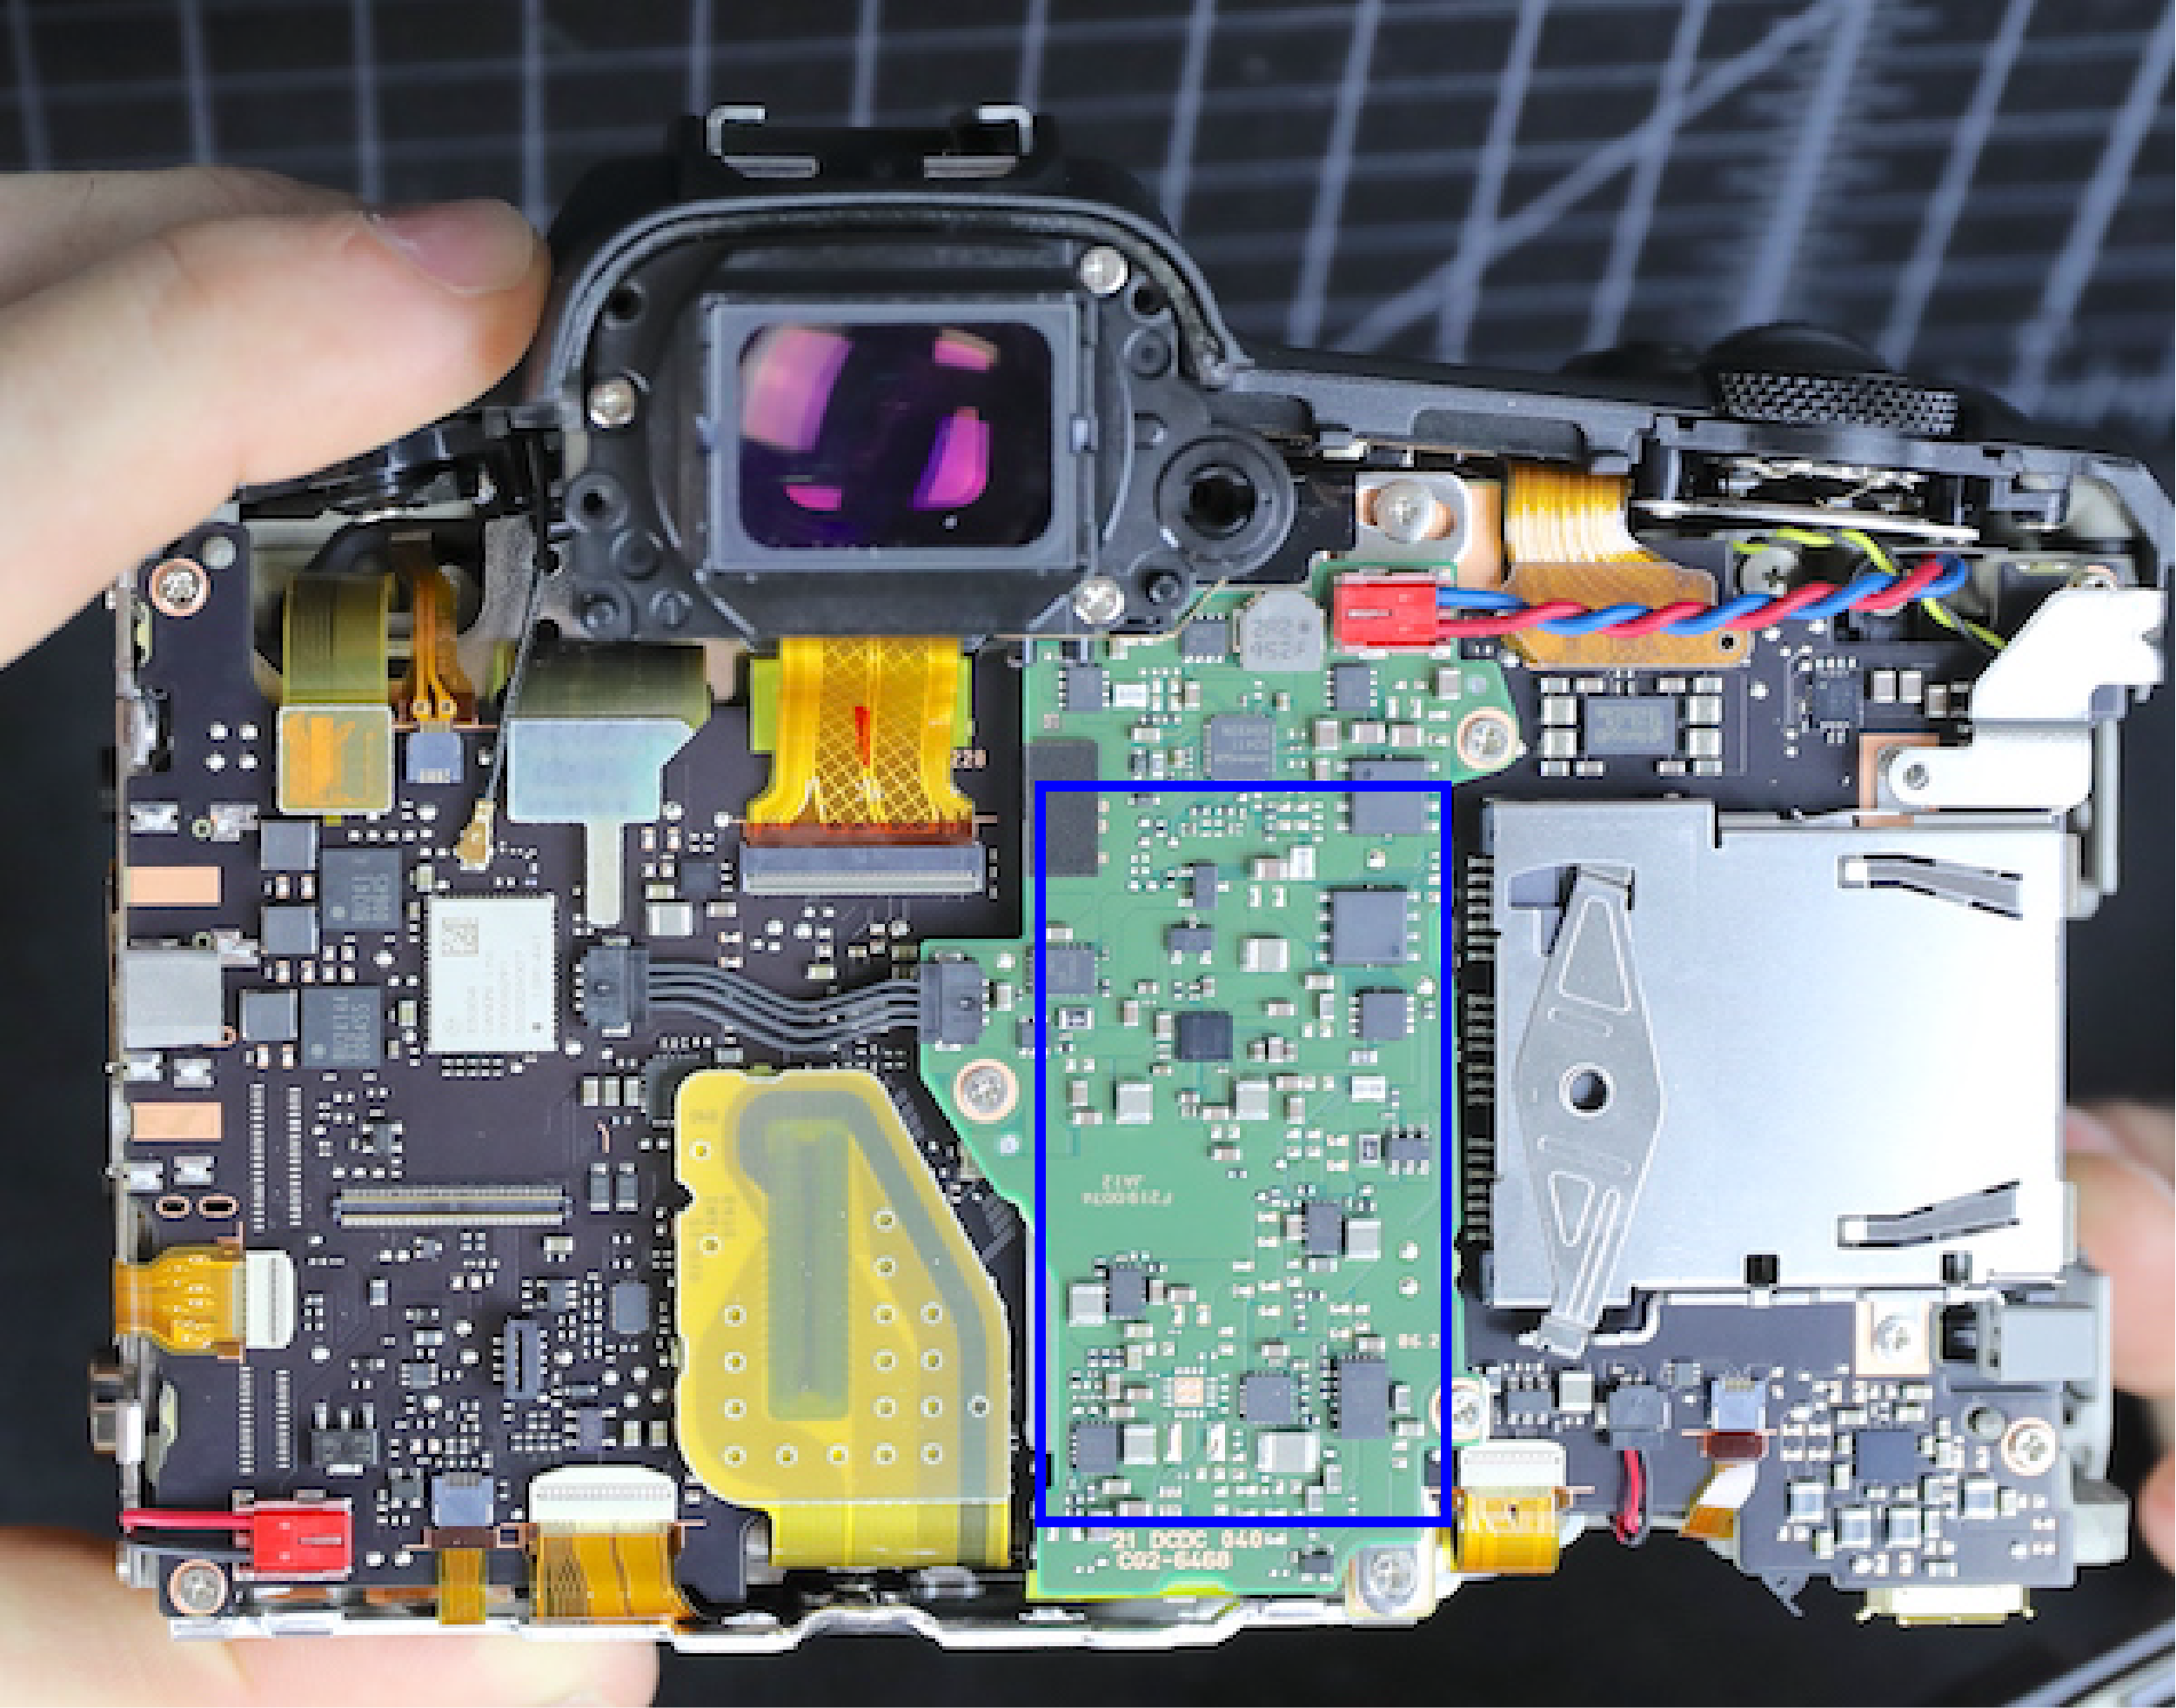
R5 thermal mod: screws to remove from PCB. Image From lensrentals.com
Remove the cable shown in the red box, and remove the screws in the red circles. You should now be able to flip the green board upwards.
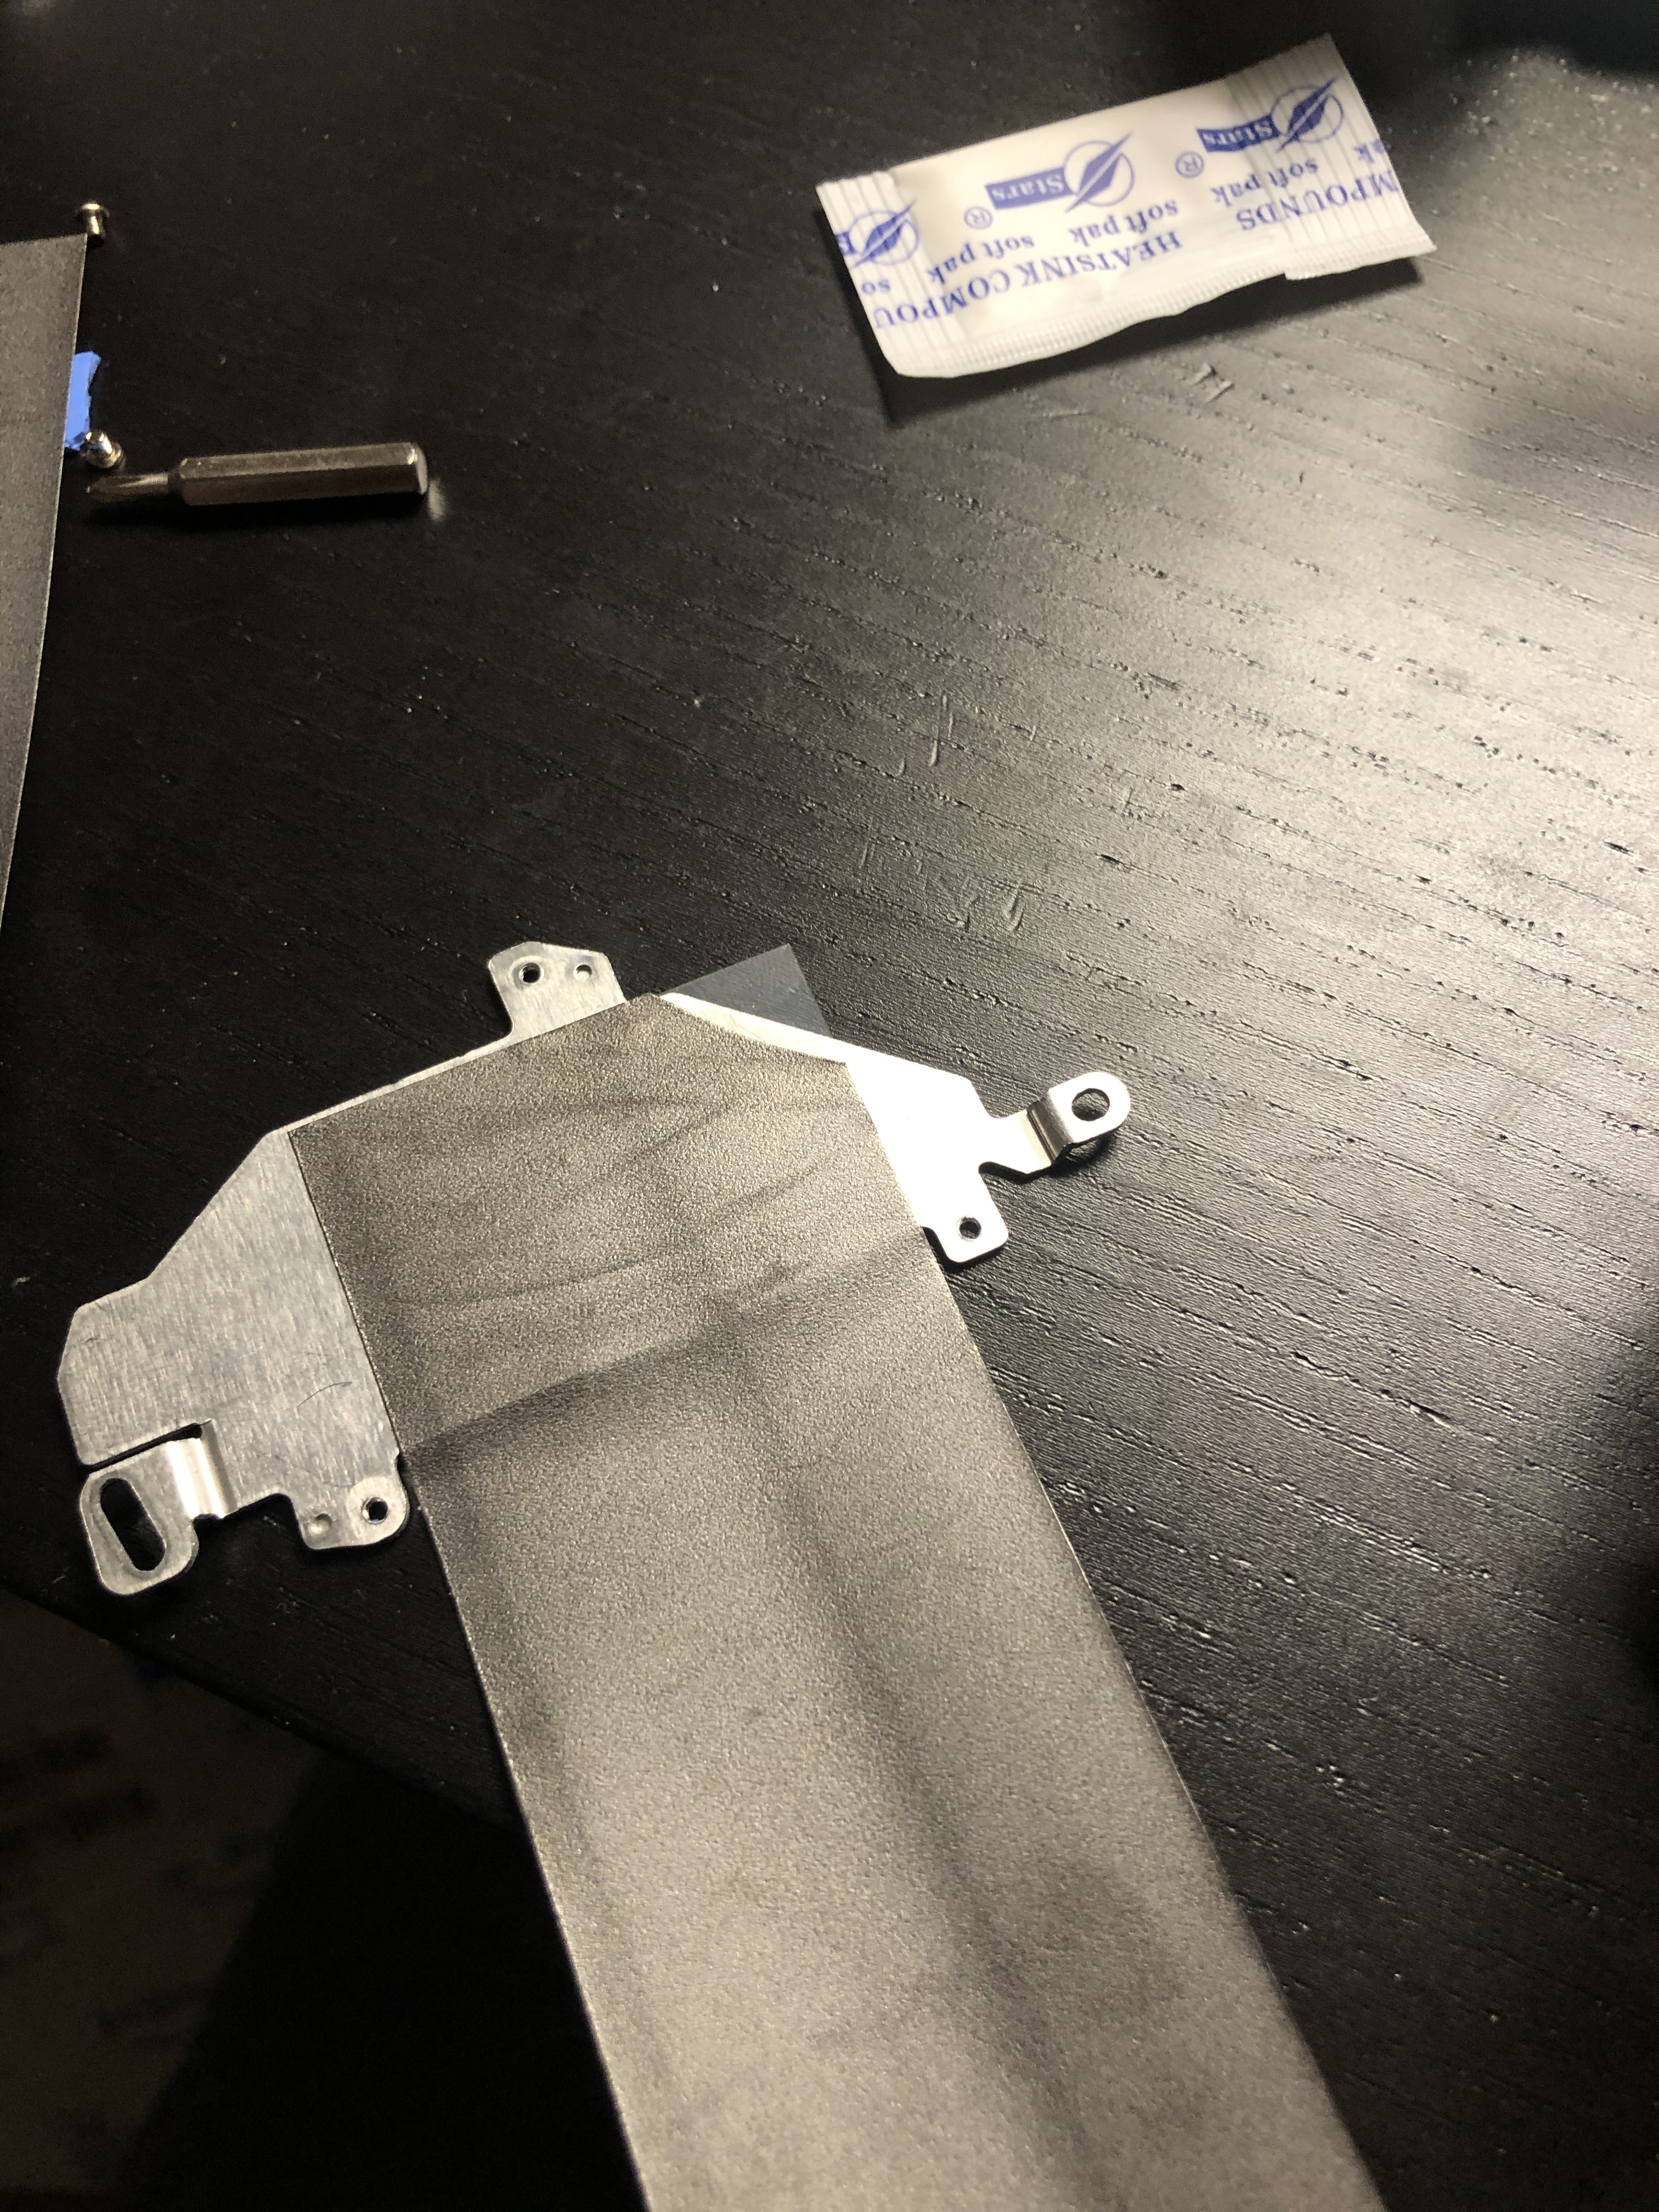
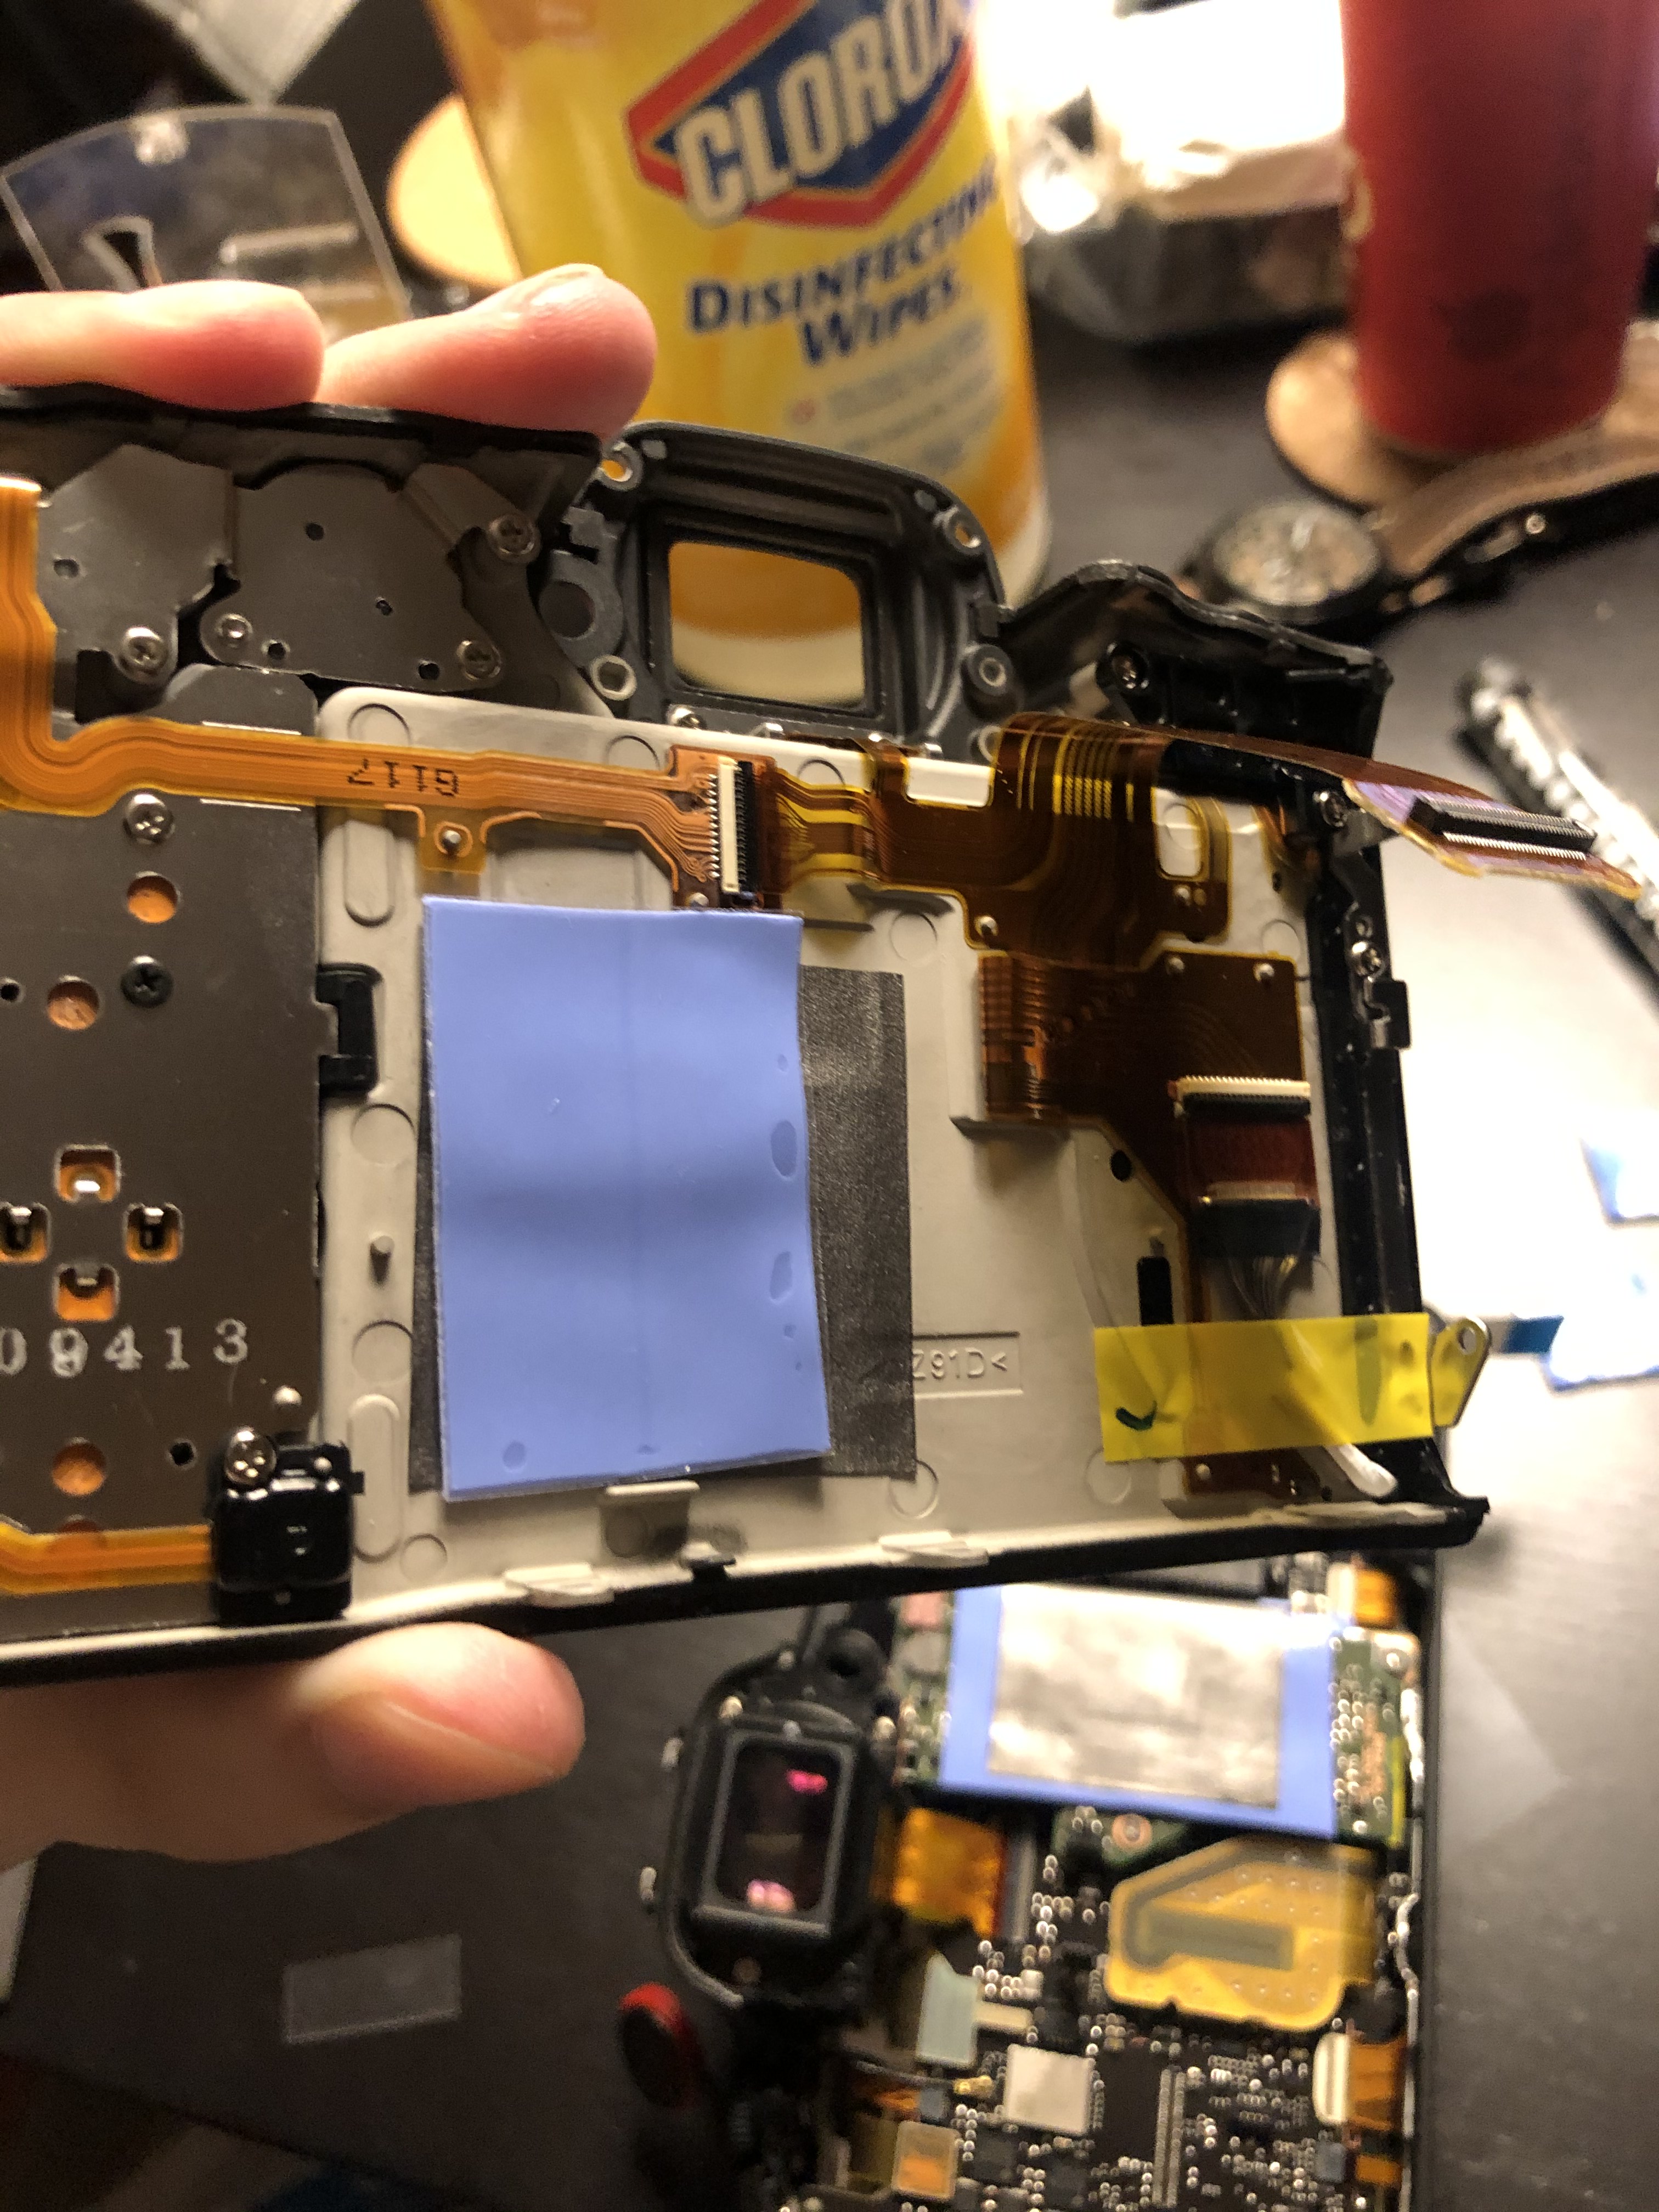
R5 thermal mod: apply thermal pads
Remove the original white thermal pads covering the memory chips. After removing factory thermal pads, apply new thermal pads according to the image above:
Blue: 1.5mm – 2mm (stack thermal pads if not thick enough)
Green: 1.0mm
Reinstall the green board. Check from sides that the thermal pads are making good contact. (Don’t forget to reconnect the cable you disconnected!)
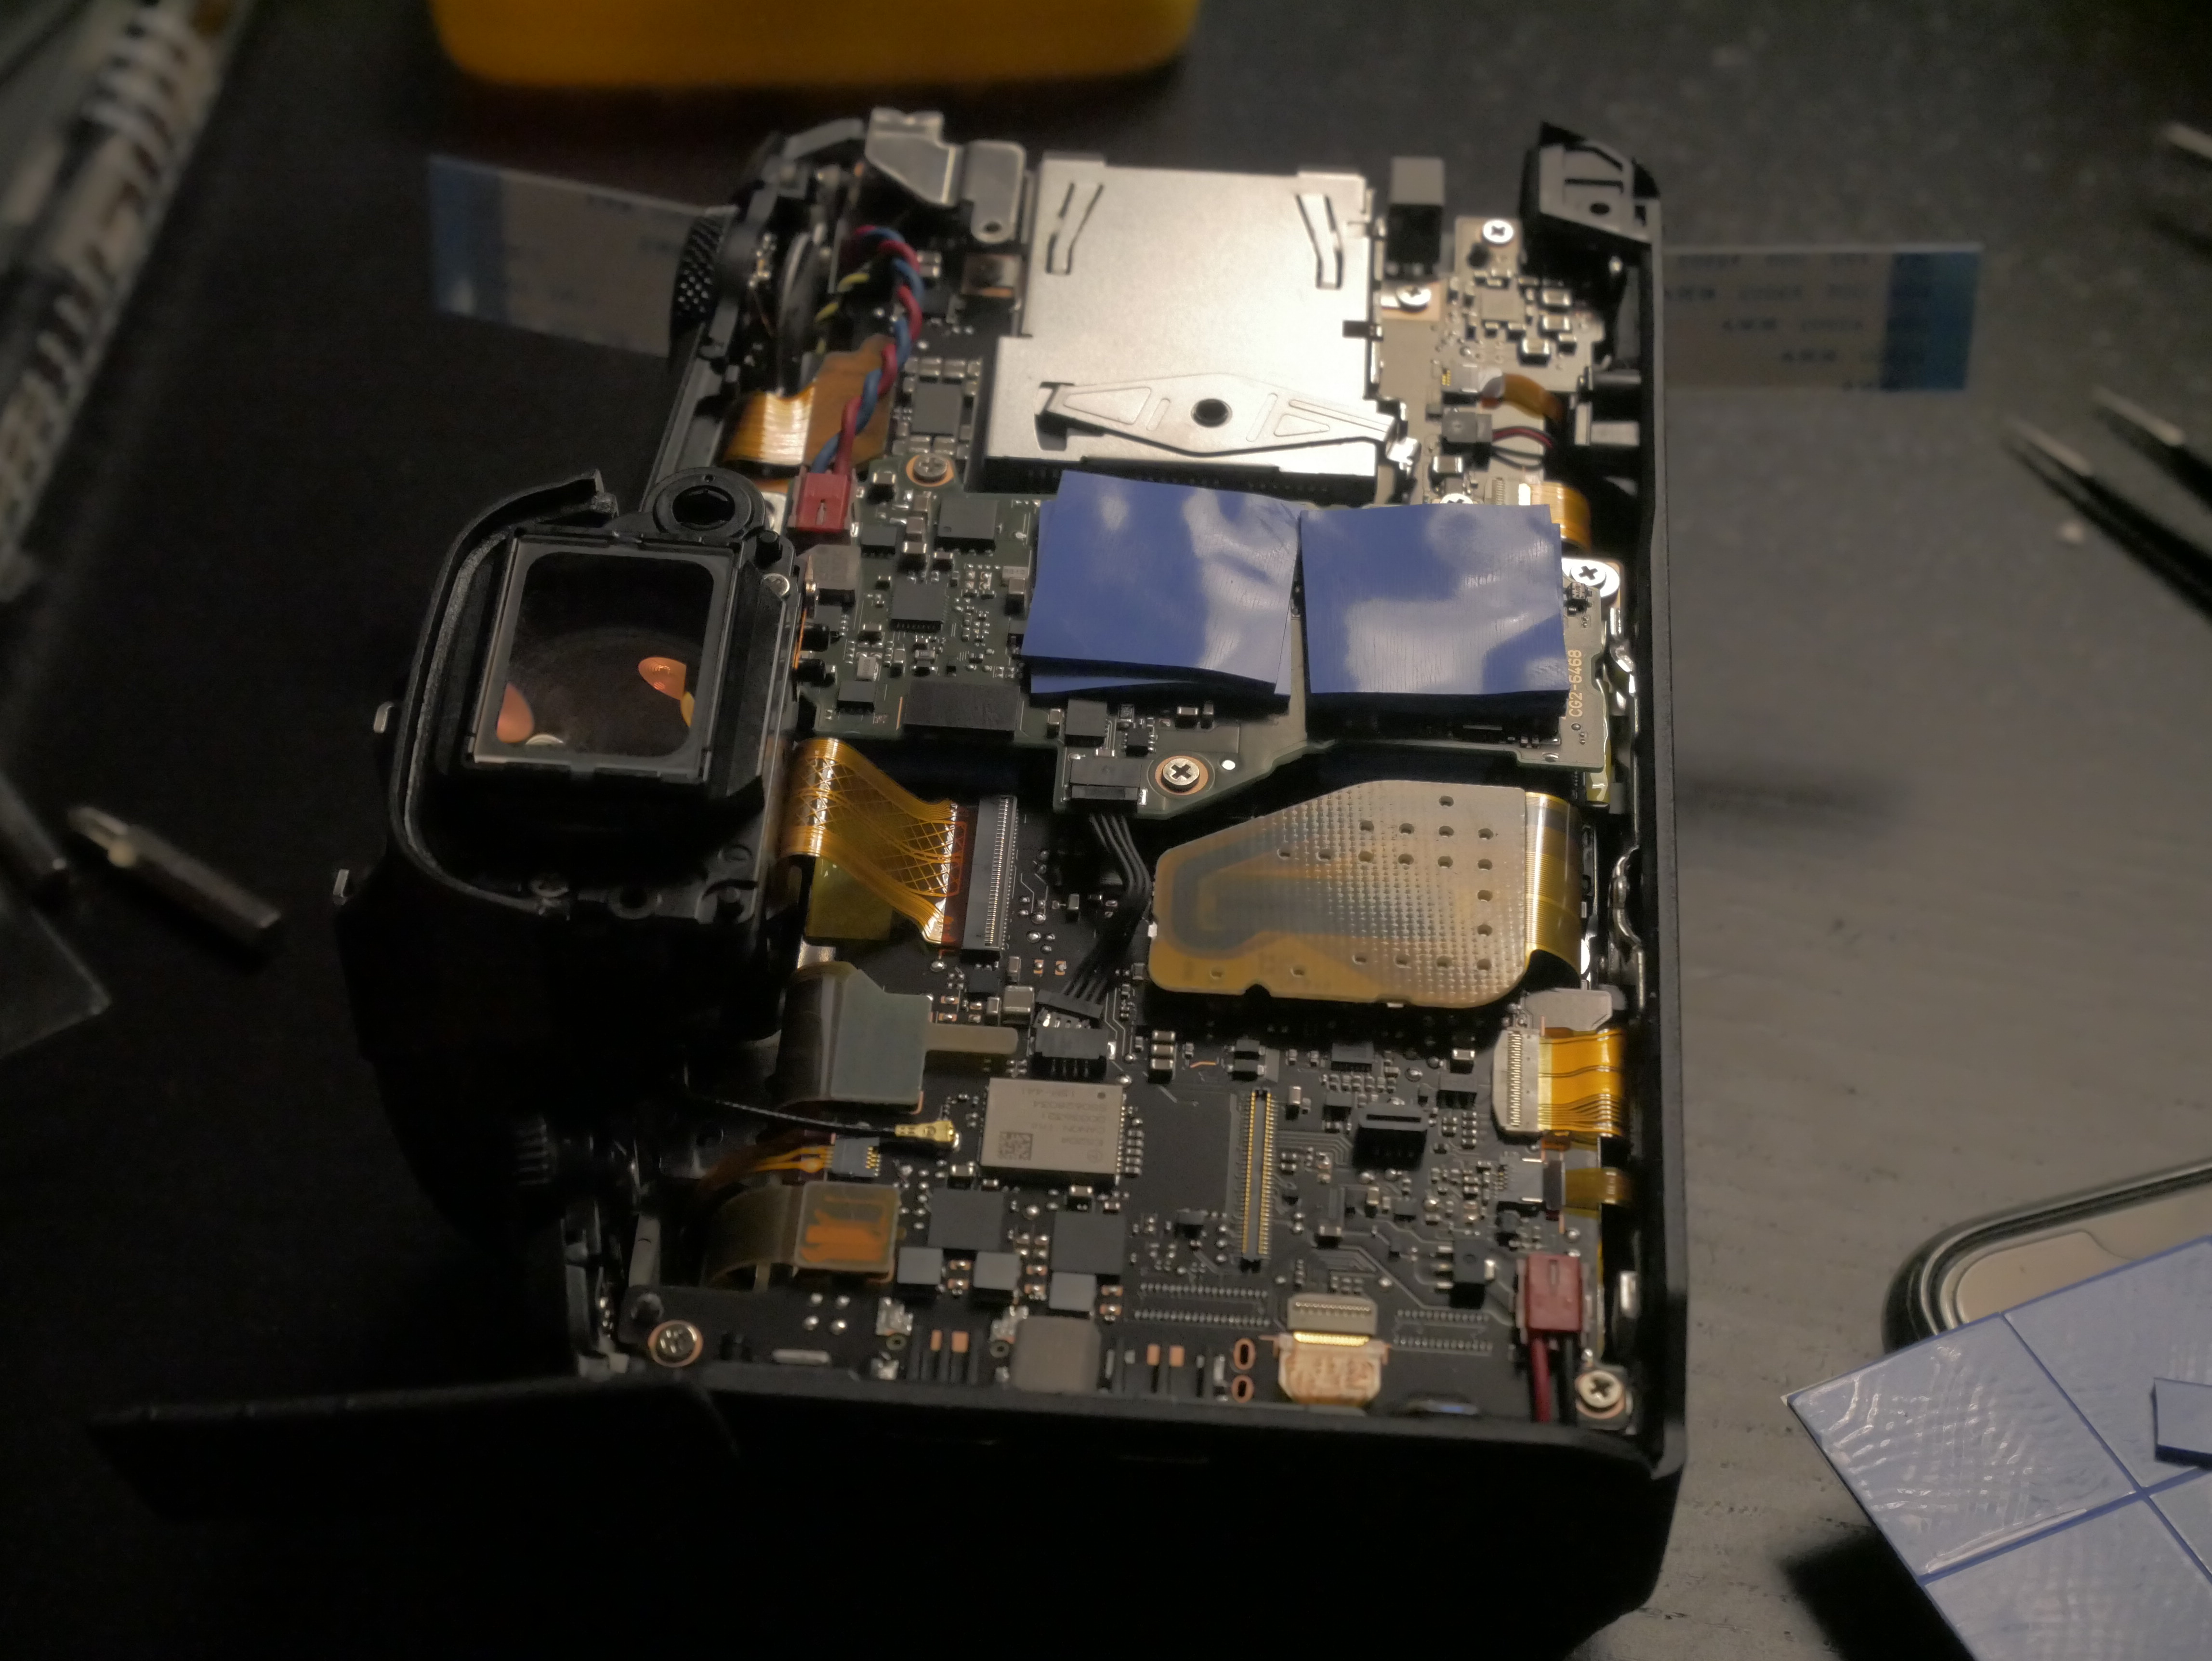
EOS R5 thermal mod: add more thermal pads. Image From lensrentals.com
Cover the blue region with 2mm thick thermal pad (stack thermal pads if not thick enough)
EOS R5 thermal mod: scrape the black blob off. Image From lensrentals.com
Scrape the black pad off the back cover shown in the image above.
Reassemble everything back. Don’t brute force it.
Done!
In my testing, with 15 degree Celsius ambient, I am able to record unlimited DCI 8K All-I. I have to format the card every 10 minutes or so but otherwise I’m able to record until the battery dies. Have fun!
EDIT:
With room temperature (25C) it will still overheat in 8K. However sticking a fan next to it fixes it. See https://www.youtube.com/watch?v=hTCeBkpHkXw for proof.
EDIT2:
Another outdoor test (Outdoors, 23°C):
A few observations:
After thermal mod, outdoors at 23°C, I’m able to get 48 minutes of 8K.
The countdown timer works more like an internal temperature measuring.
After overheating, with 8 minutes of cooldown, I’m able to get another 28 minutes of 8K.
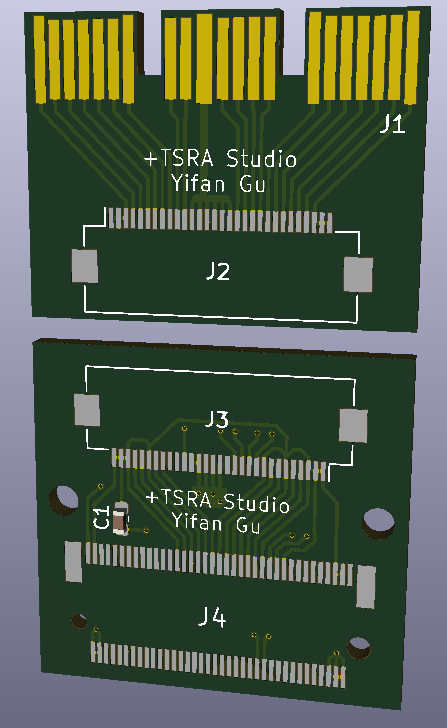
This is a newer iteration of the CFExpress – M.2 Adapter, with better routing to ensure signal integrity on the M.2 side. And the PCBs are now copper poured for both GND and +3.3V on the M.2 side.
As I mentioned in a previous post, it seems that it’s totally possible to convert a NVME SSD to a CFExpress Card. So here’s my first take on that.
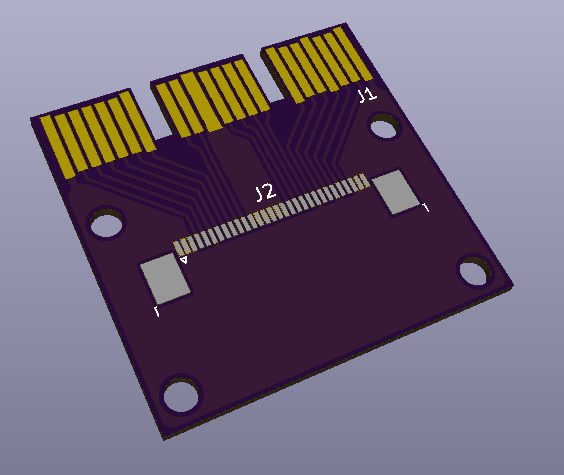
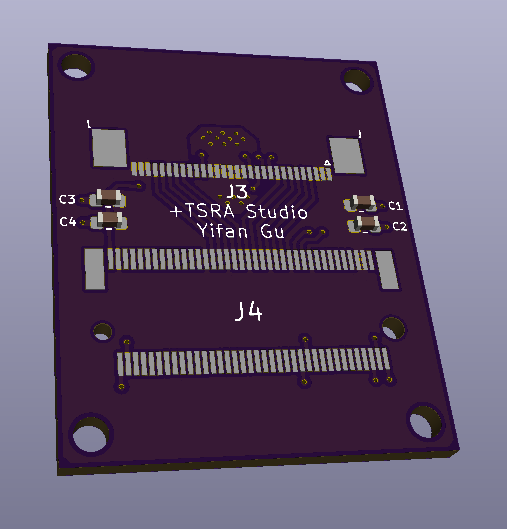
Adapter PCB Layout
J1 is the PCB edge connector for the CFExpress card, J2, J3 are FFC (ribbon cable) connectors, and J4 is the M.2 connector.
I’m 99% sure that this will not work on the first try. But I think it has a good chance of working after a few iterations. I have sent my gerber files to OSHPark for fabrication, wish me luck.
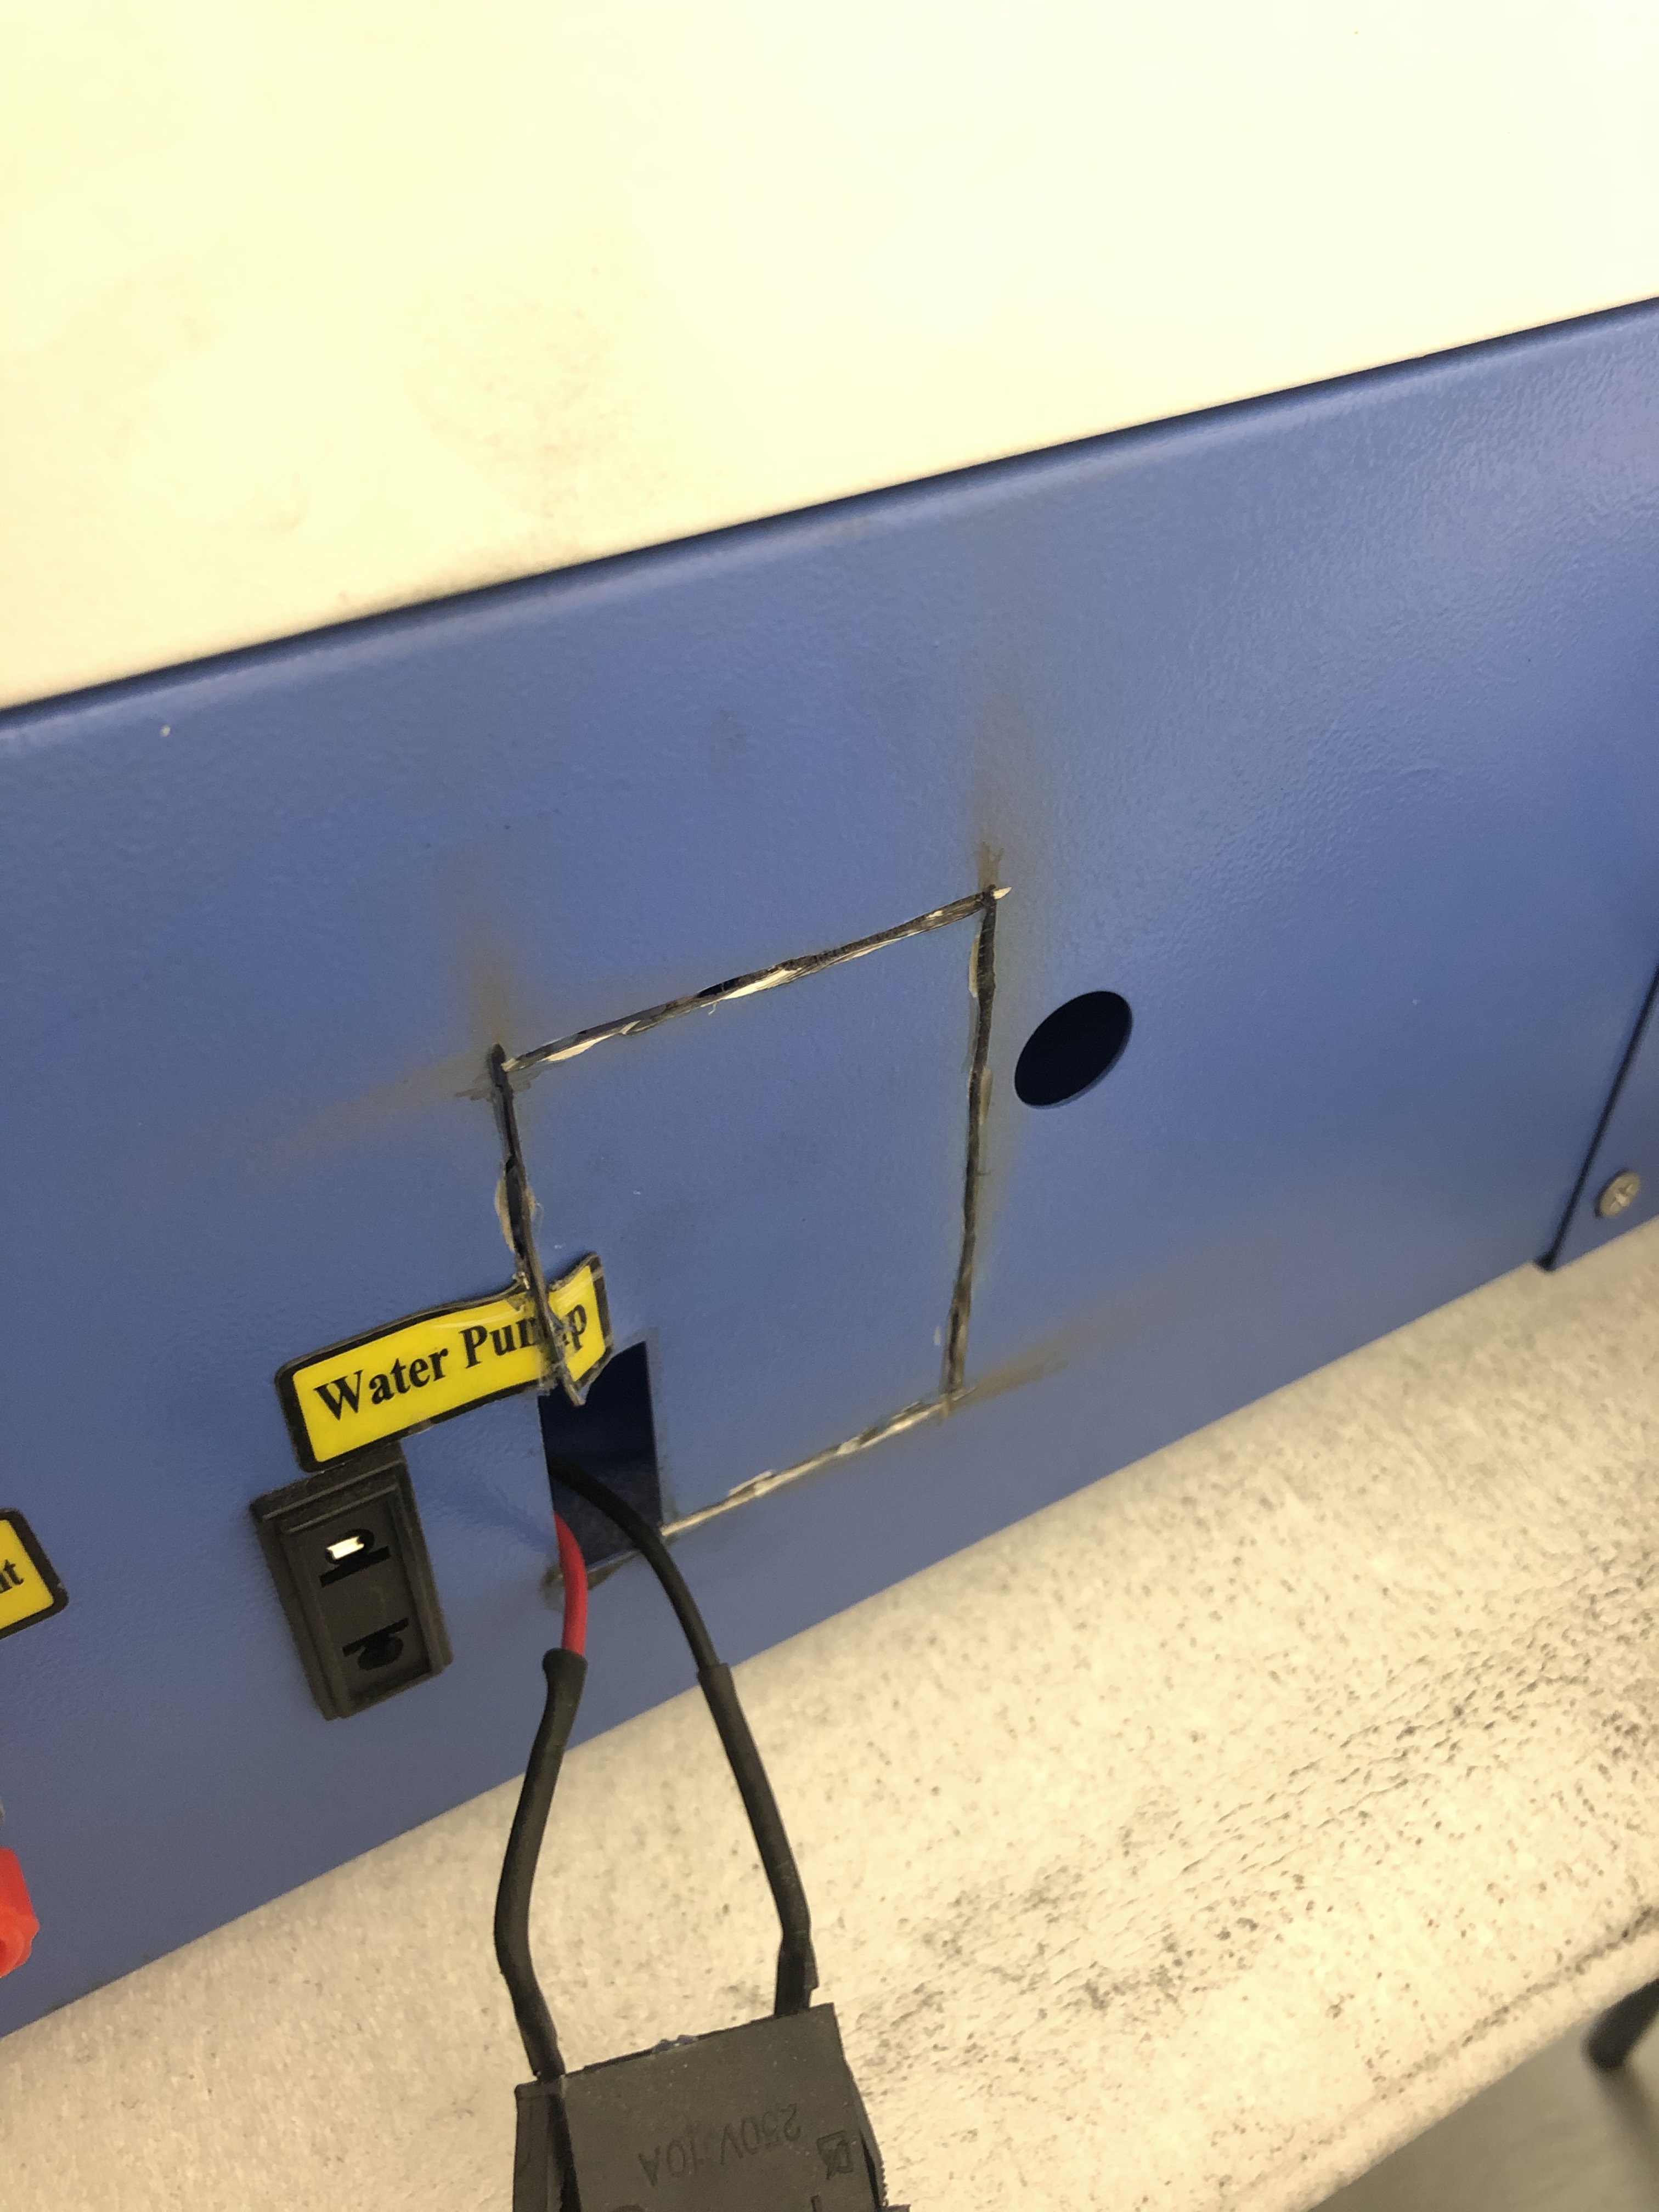
One of the downsides of the K40 is the electrical outlets: they are not grounded. This is somewhat a issue because by duct fan has a grounding prong and I cannot connect that to the included outlets. So time to add an actual real electrical outlet.
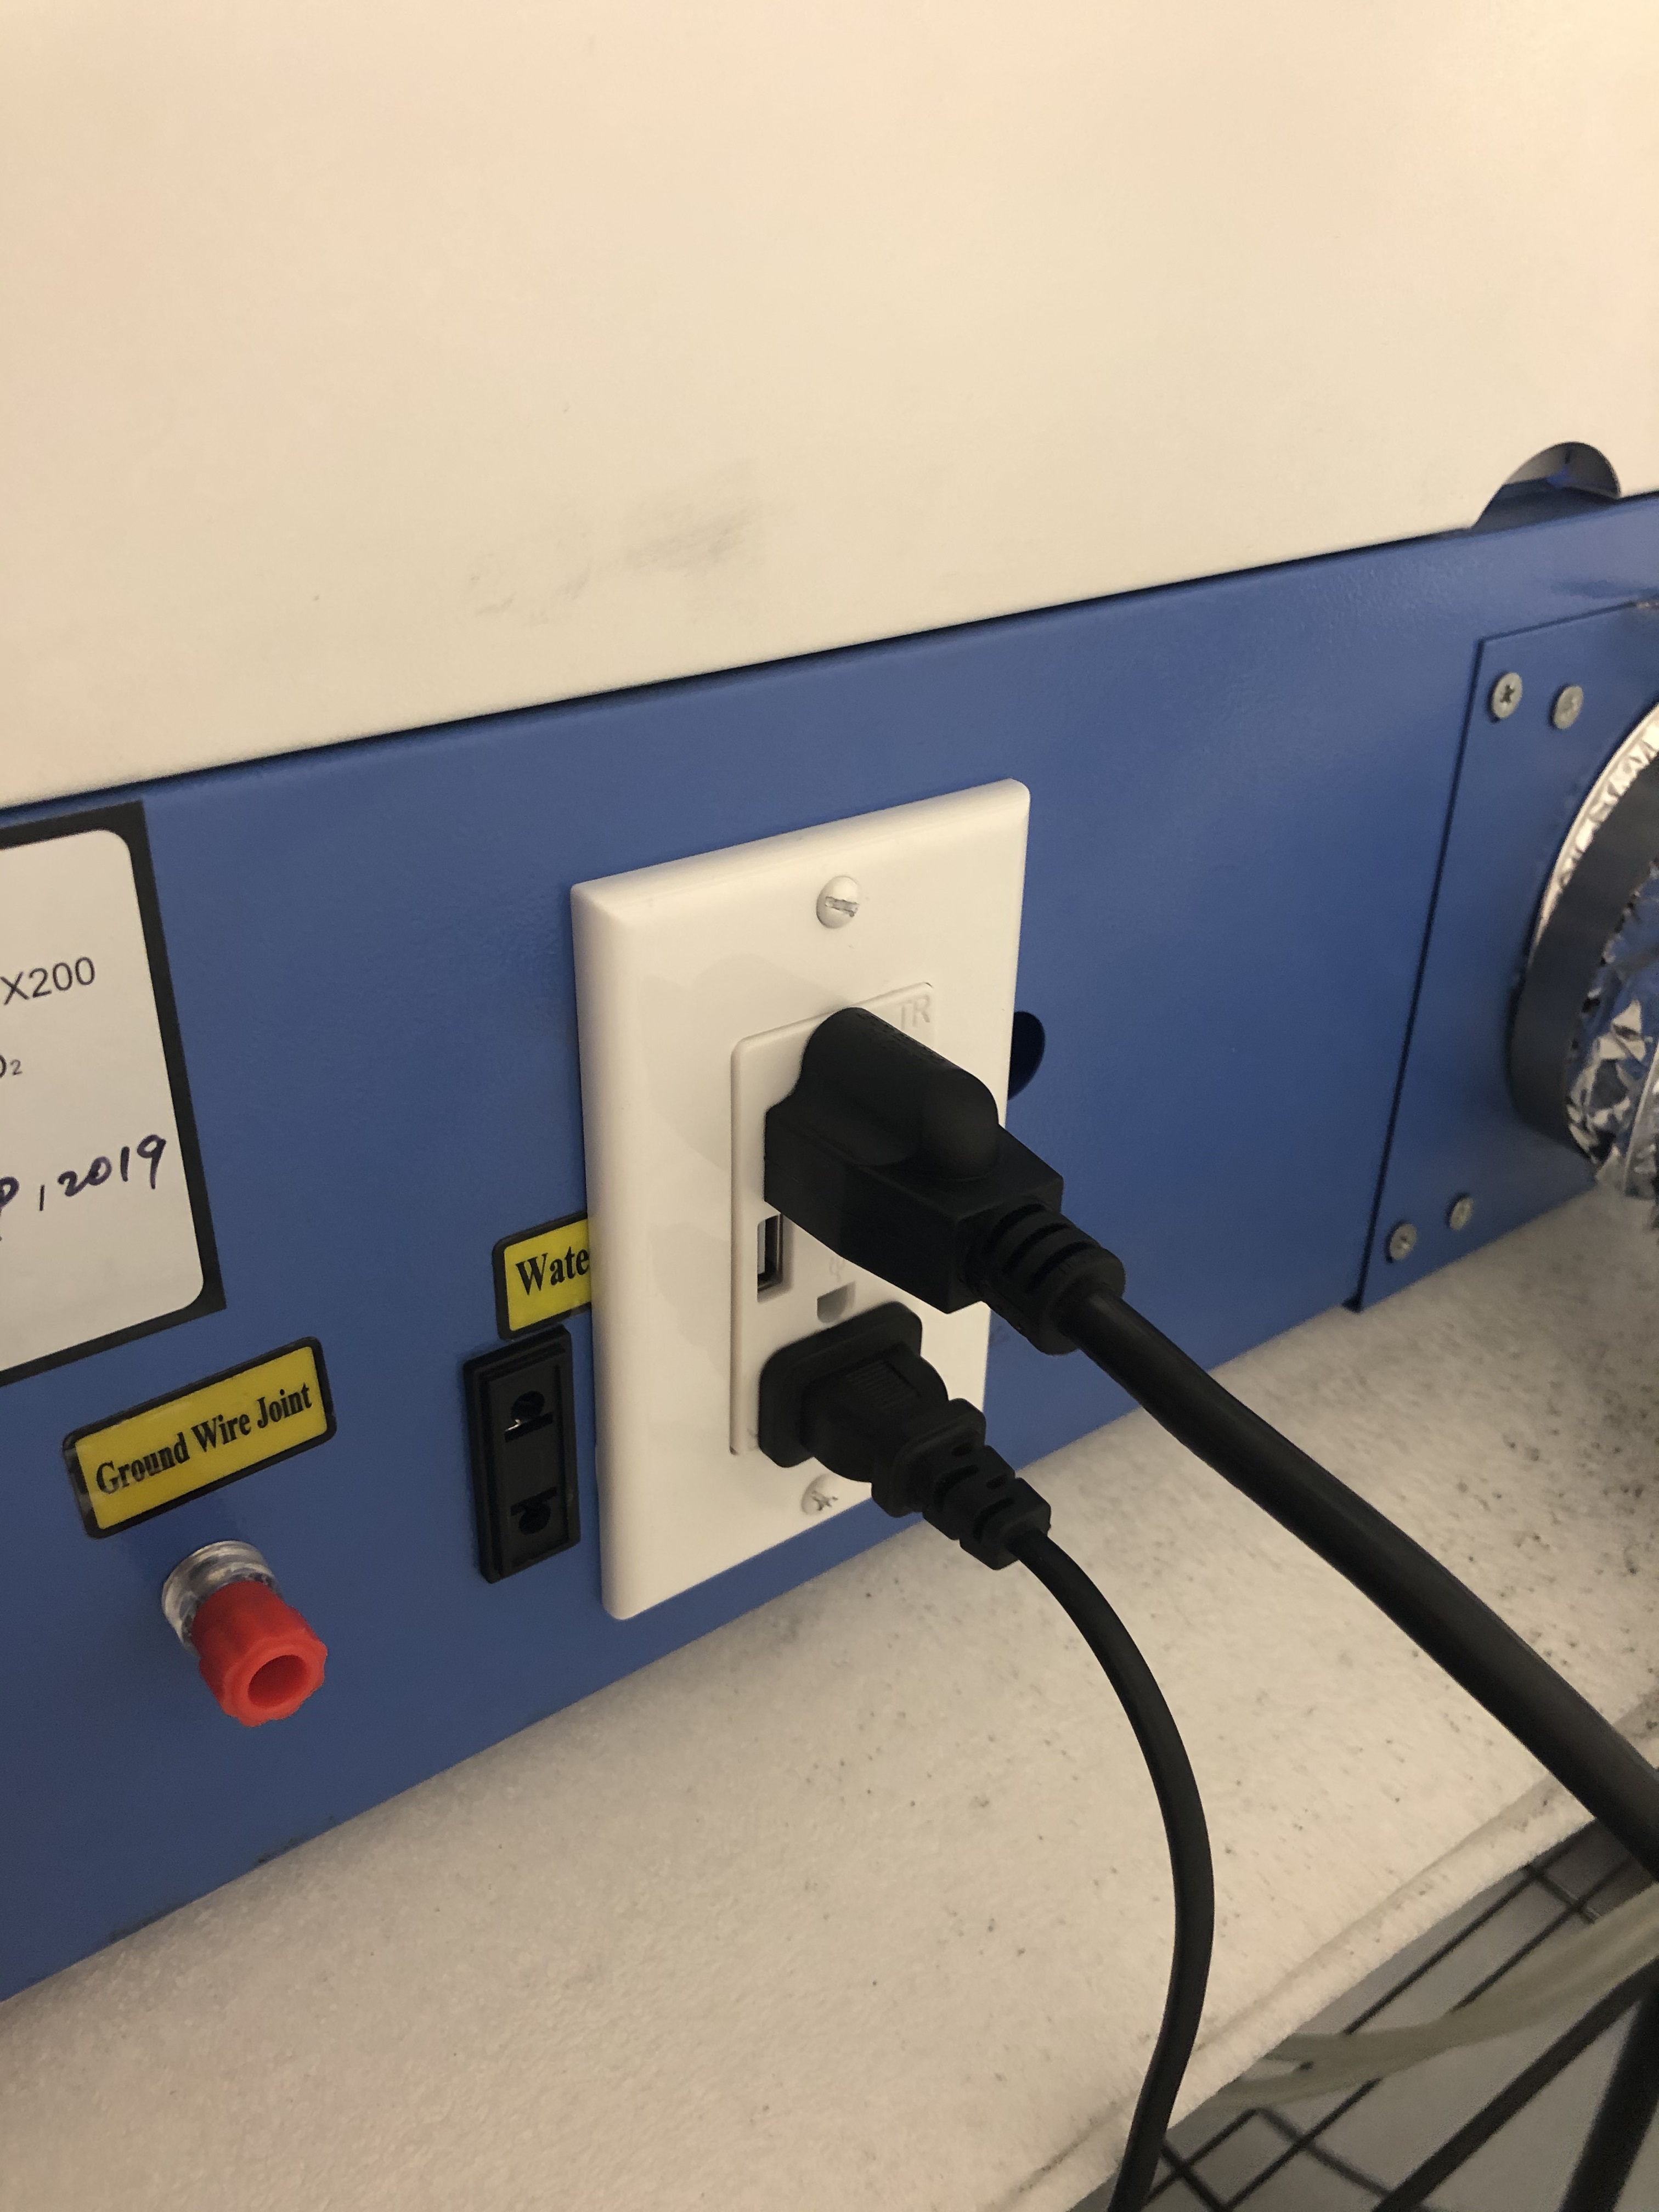
Dremel!After
It even comes with 2 extra USB ports in case I need those.